You can identify most knitting stitches from a photo by looking for key visual characteristics: smooth Vs indicate stockinette, horizontal ridges mean garter stitch, vertical columns signal ribbing, twisted ropes reveal cables, and deliberate holes point to lace. Stitch identification is one of the most practical skills a knitter can develop — it lets you reverse-engineer garments you love, troubleshoot your own work, and communicate clearly about what you want to create. With platforms like Ravelry hosting millions of project photos and Pinterest overflowing with knitwear inspiration, being able to look at a photo and name what you see is genuinely useful every day. Tools like La Maille can also analyze photos automatically, but understanding stitch structure yourself makes you a faster, more confident knitter who can verify and refine any result.
The Foundation: Knit and Purl
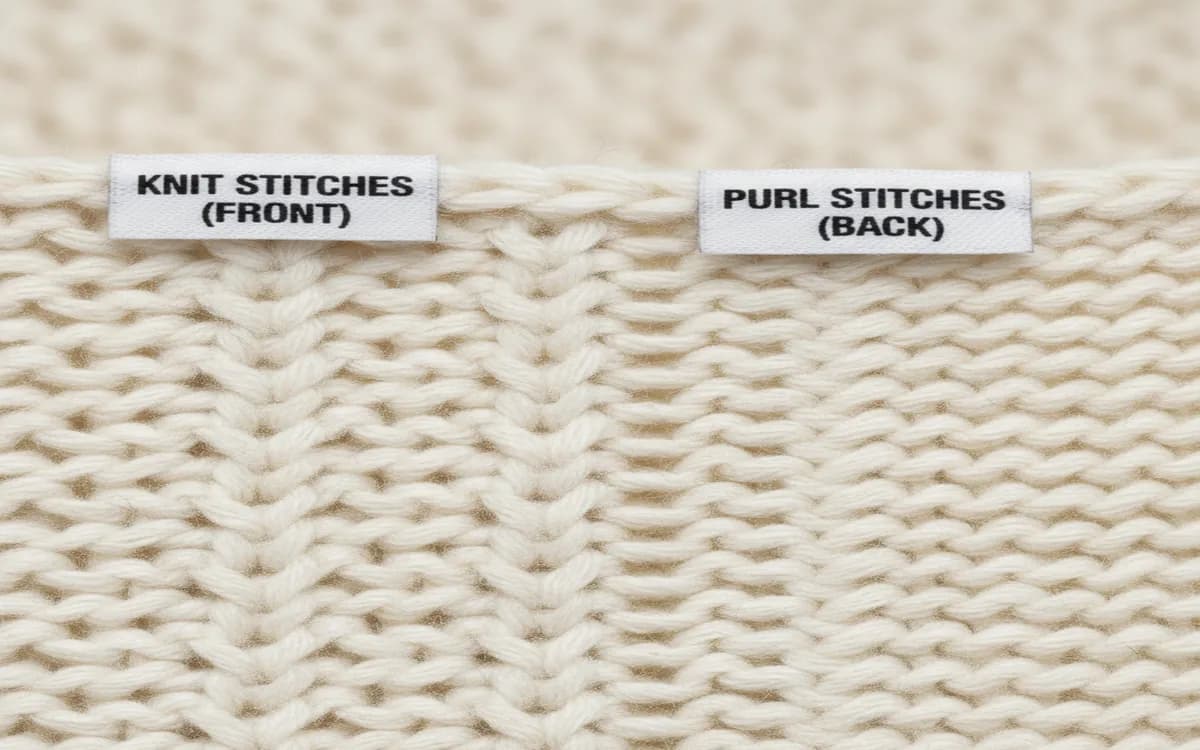
Every stitch pattern in knitting — from the simplest dishcloth to the most intricate lace shawl — is built from just two fundamental stitches: the knit stitch and the purl stitch. Everything else is a combination, variation, or creative arrangement of these two moves.
Knit stitches look like small Vs stacked on top of each other in neat vertical columns. When you see smooth, uniform, V-shaped fabric, you are looking at the knit side. Each V represents one stitch in one row.
Purl stitches look like horizontal bumps or rounded waves sitting across the fabric. The purl stitch is simply a knit stitch worked from the opposite direction — which is why the back of stockinette fabric looks like all purls even when you only knit on the right side.
Understanding this fundamental relationship is the key that unlocks every other stitch identification. When you can spot a V and a bump in any fabric, you can decode almost anything.
A useful mental model: knit stitches recede into the fabric and create smooth surfaces; purl stitches pop forward and create texture. Designers use this contrast deliberately to build every pattern you will ever encounter.
Stockinette Stitch
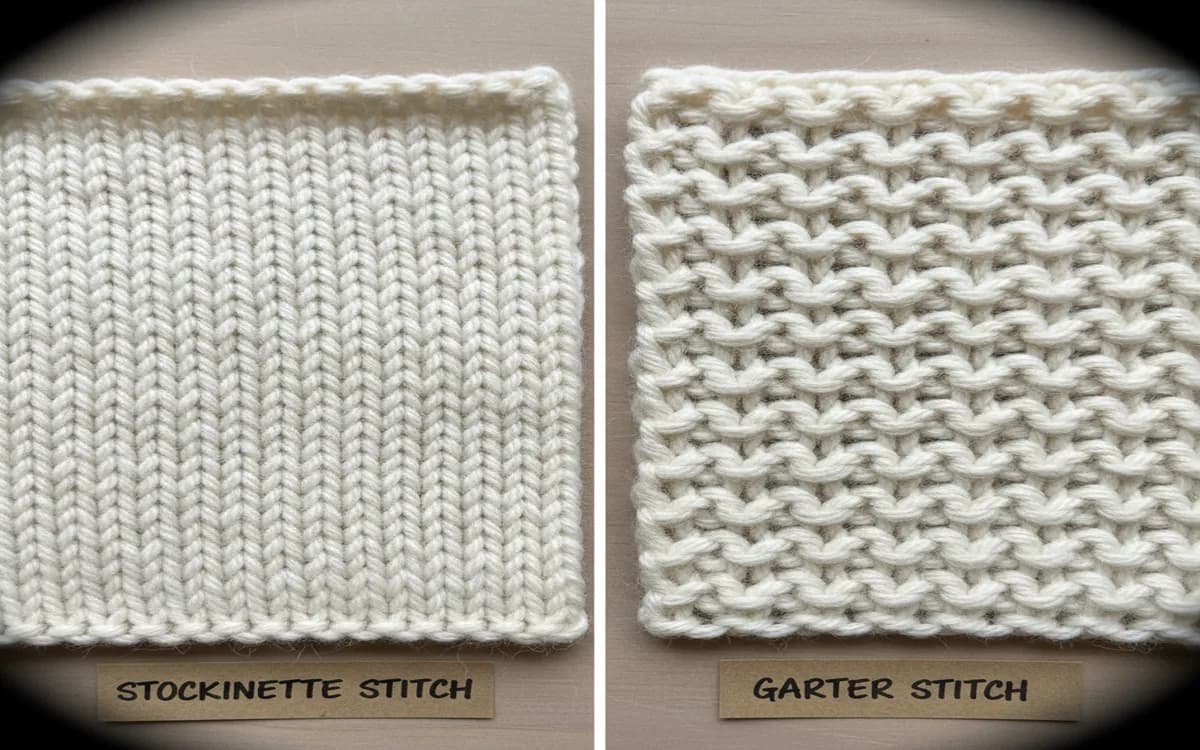
What it looks like: Smooth fabric with neat columns of V-shaped stitches on one side, and horizontal bumps on the other.
Where you'll see it: Stockinette is the most common knitted fabric in the world. The body of most commercial sweaters, T-shirts, and fitted garments are worked in stockinette or its machine-knit equivalent. It is the default fabric for beginner and experienced knitters alike.
How to identify: Look for the characteristic V pattern marching in straight vertical columns. The fabric has a clear "right side" showing smooth Vs and a "wrong side" showing bumps. In good light, you can count the individual stitches as distinct V shapes.
Watch out for: The edges of stockinette curl — this is not a mistake, it is the fabric's natural behavior. Stockinette rolls toward the purl side at the top and bottom edges, and toward the knit side along the side edges. If you see curling edges in a photo, stockinette is almost certainly involved.
Gauge note: In most worsted weight yarns, stockinette typically produces approximately 18 to 22 stitches per 10 cm (4 inches), depending on needle size and individual tension. This is useful context when recreating a garment from a photo.
Reverse Stockinette
What it looks like: The bumpy "wrong side" of stockinette deliberately used as the right side of the fabric.
Where you'll see it: Reverse stockinette appears in textured garments where the designer wants a pebbled surface, or as a background for cables that makes the cables pop forward more dramatically. It is also used for contrast panels in colorwork or patchwork-style designs.
How to identify: Rows of horizontal bumps running across the fabric in a consistent, even pattern. The fabric still has the same structure as stockinette — it is simply flipped. Edges will still curl, but in the opposite direction.
Tip: When you see cables on a garment, the background fabric is very often reverse stockinette rather than plain stockinette. The bumpy background makes the smooth cable twists stand out visually.
Garter Stitch
What it looks like: Ridged fabric with horizontal lines running all the way across. Looks exactly the same on both sides — it is fully reversible.
Where you'll see it: Borders, scarves, dishcloths, and sometimes entire garments or yokes. Garter stitch is beloved for baby items and accessories because it lies flat without any curling. Many beginner patterns use garter stitch for this reason.
How to identify: Alternating rows of smooth Vs and bumpy ridges create a consistent wave pattern across the fabric. Count the ridges — each visible ridge represents two rows of knitting. A 40-row swatch in garter stitch will show 20 ridges. The fabric is noticeably thicker and squishier than stockinette worked at the same gauge.
Key difference from stockinette: Garter stitch is reversible and shows ridges on both sides; stockinette is smooth on one side only. Garter fabric does not curl. Garter stitch is also shorter per row — it takes roughly 8 ridges to equal the same height as 10 rows of stockinette in the same yarn.
Ribbing
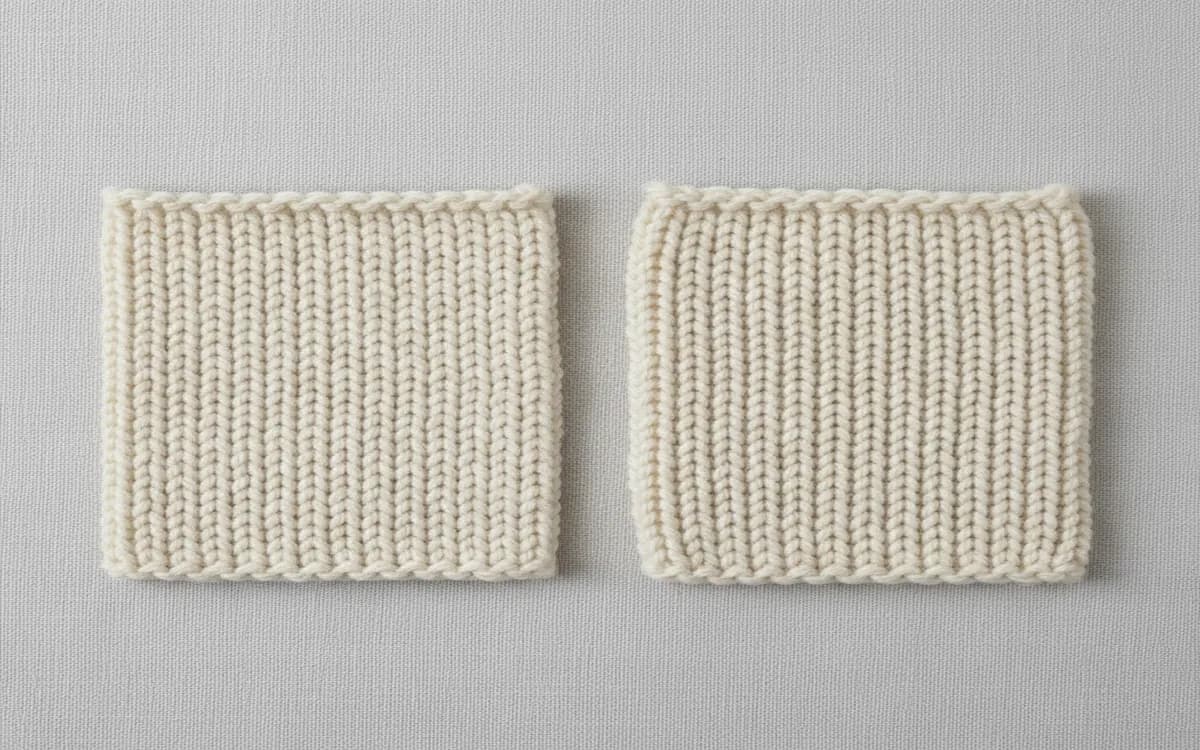
What it looks like: Vertical columns of alternating knit and purl stitches that create raised ridges running lengthwise through the fabric.
Where you'll see it: Cuffs, hems, necklines — anywhere you need stretch and recovery. Ribbing can stretch up to 50% beyond its resting width and return to shape, making it ideal for any opening that needs to grip without binding. It is also used for entire fitted garments like body-conscious sweaters and tube tops.
Common types:
- 1x1 ribbing: Alternating single knit and purl columns (K1, P1 repeated). Creates a fine, dense elastic fabric.
- 2x2 ribbing: Pairs of knit and purl columns (K2, P2 repeated). More visible columns and slightly more stretch than 1x1.
- Broken ribbing: Variations with unequal numbers such as 2x1, 3x1, or 3x2. The columns have different widths, creating an asymmetric but still vertical look.
How to identify: Look for vertical lines with depth and dimensionality. The knit columns push toward you while the purl columns recede. In a photo, this creates light and shadow that runs vertically. Ribbing also pulls the fabric inward — a ribbed swatch is narrower than the same stitch count in stockinette.
Counting columns: If you can count the columns clearly, you can name the ribbing pattern. Two knit columns followed by two purl columns repeating = 2x2 ribbing. This precision helps when writing your own pattern from an observed garment.
Seed Stitch (Moss Stitch)
What it looks like: A bumpy, uniformly textured fabric with no discernible columns or rows — like scattered seeds or a field of tiny pebbles. In the UK and some European countries, this fabric is often called moss stitch.
Where you'll see it: Borders, textured panels, blankets, and any context where a flat, non-curling, reversible fabric is needed. Seed stitch is frequently used as an alternative to ribbing for cuffs and hems when the designer wants texture without vertical pull.
How to identify: Each knit stitch sits directly above a purl stitch, and each purl sits above a knit. This deliberate misalignment prevents columns from forming. The result is a dense, even pebbly texture. The fabric lies completely flat with no curl and has the same appearance on both sides.
Key difference from ribbing: Ribbing has clear vertical columns; seed stitch looks even and scattered with no dominant direction. Ribbing has more stretch; seed stitch has almost none. If the bumps form vertical lines, it is ribbing. If the bumps look random, it is seed stitch.
Gauge note: Seed stitch typically uses about 10% more yarn than stockinette at the same gauge because of the additional texture. This is worth knowing when estimating yardage from a photo.
Cables
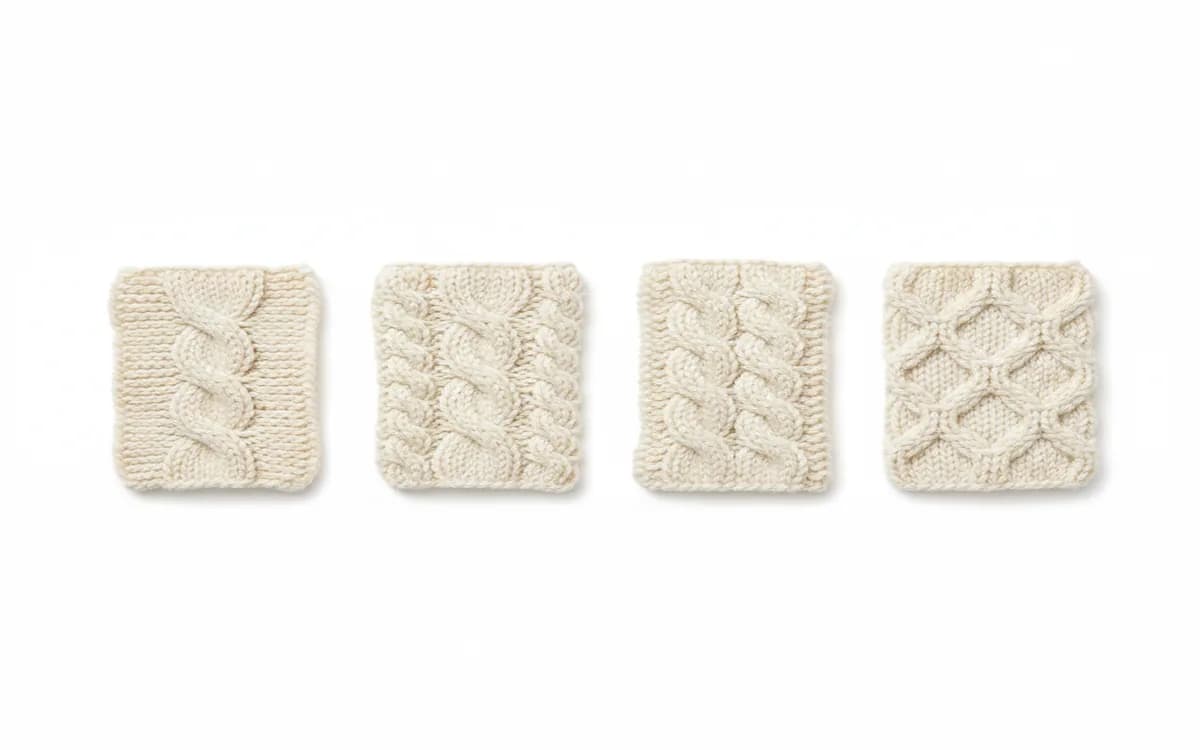
What it looks like: Raised, twisted, rope-like patterns where stitches cross over each other to create braided or interlaced designs.
Where you'll see it: Aran sweaters, fisherman's knits, cardigans, hats, and any garment referencing Celtic or traditional British knitting heritage. Cables are also used as accent panels in otherwise plain garments.
How to identify: Look for raised braided patterns where stitches visibly cross — you can see one group of stitches passing in front of or behind another. The twist direction tells you which way the cable crosses: left-leaning cables cross the front stitches to the left, right-leaning cables cross to the right. A simple 2-stitch twist can look like a small braid, while a complex 8-stitch honeycomb cable fills a wide panel.
Variations: Cable patterns range from a simple 2-over-2 cross (often called a C4F or C4B) all the way to intricate patterns like the horseshoe cable, rope cable, tree of life, or honeycomb. The fundamental principle is always the same: stitches temporarily skip out of order and cross over their neighbors. Cables pull the fabric inward significantly — a 10-stitch cable panel can measure only 2 to 3 cm wide despite containing 10 stitches.
Lace
What it looks like: Fabric with intentional, decorative holes forming geometric or organic patterns. The holes are as important to the design as the solid stitches.
Where you'll see it: Shawls, stoles, summer tops, lightweight cardigans, decorative panels, and edgings. Lace ranges from very simple eyelets (a single hole per motif) to complex Estonian lace with dozens of stitches per repeat.
How to identify: The holes are deliberate, evenly spaced, and form a recognizable pattern or motif. Each hole (a yarn-over) is paired with a corresponding decrease (k2tog, ssk, or sl2-k1-p2sso) that keeps the stitch count constant. The result is a balanced, patterned fabric where the negative space is intentional.
Key difference from dropped stitches: Lace holes are consistent in size, evenly distributed, and form a repeating pattern. Dropped stitches create irregular ladders that run vertically down the fabric and become progressively wider. If the holes look chaotic or one-directional, suspect an accident rather than a design choice.
Yarn matters: Lace is most visible in smooth, single-ply, or plied yarns. Fuzzy yarns like mohair obscure the hole definition. If a photo shows halos around every stitch, the yarn is probably a mohair or angora blend, which can make stitch identification harder but also adds to the characteristic look.
Colorwork
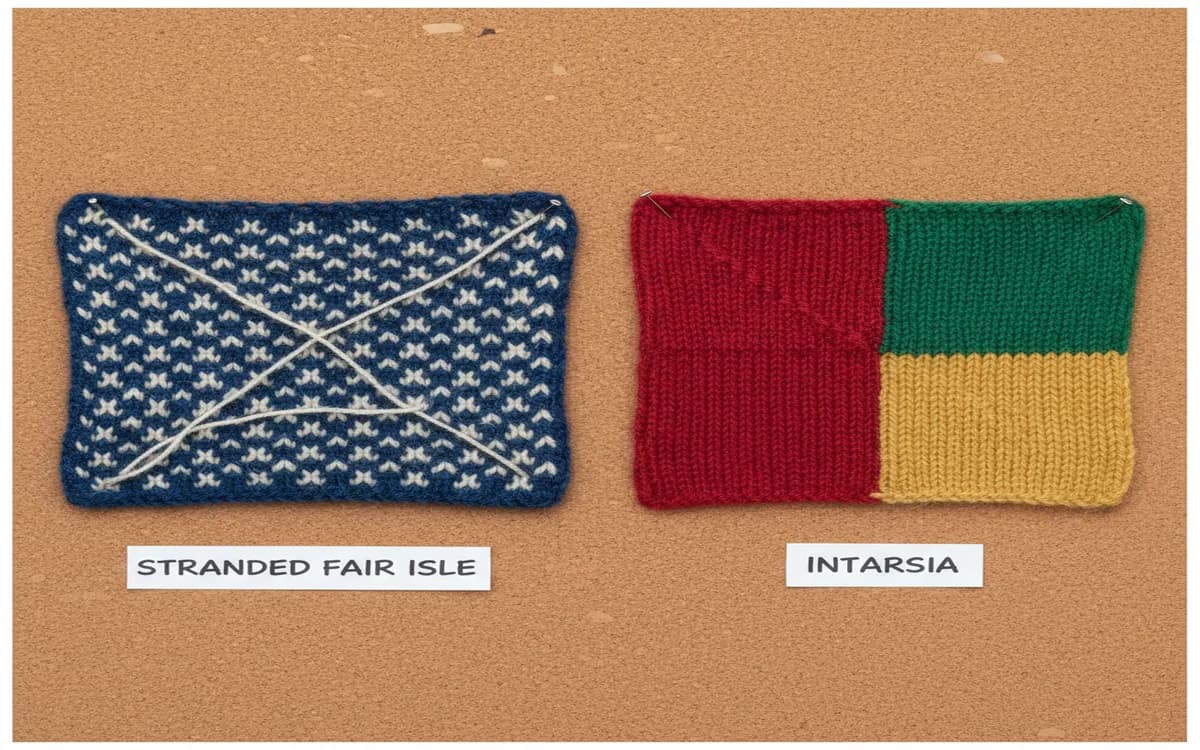
Stranded (Fair Isle)
What it looks like: Multiple colors appearing within single rows to form geometric patterns. The background and motif colors alternate frequently — typically every 2 to 7 stitches — creating a dense, warm fabric.
How to identify: Colors change frequently across a single row. The pattern repeats horizontally at regular intervals. On the wrong side, you would see horizontal floats — strands of the unused color carried across the back. True Fair Isle uses only 2 colors per row, though stranded colorwork can use more.
Intarsia
What it looks like: Large blocks or shapes of different colors, each section worked as a solid color. Think argyle diamonds, picture knitting, large graphic motifs, or bold color-blocked panels.
How to identify: Large areas of single color that would be impractical to strand across. Each color section has its own yarn bobbin. On the wrong side, you see twisted yarn ends at color joins rather than long floats. Intarsia is not stretchy and does not produce a double-thick fabric the way stranded work does.
Stripes
What it looks like: Horizontal bands of two or more colors. The simplest form of colorwork.
How to identify: Color changes happen cleanly between entire rows rather than within them. Even stripes alternate every 2 rows; uneven stripes change at irregular intervals. The easiest colorwork technique to spot and the easiest to recreate.
Tips for Analyzing Photos
Developing a systematic approach to photo analysis makes stitch identification much faster and more reliable.
Zoom in: Most phones and computers let you pinch or scroll to zoom on images. Getting close enough to see individual stitch loops — the actual V shapes and bumps — is the single most useful thing you can do. A blurry distant photo is hard to read; a zoomed detail shot reveals everything.
Look at the edges: Hems, cuffs, necklines, and button bands often show different stitch patterns than the body. These borders are frequently worked in ribbing or garter stitch and provide easy reference points.
Check the texture: Smooth and flat usually means stockinette. Ridged horizontally means garter. Ridged vertically means ribbing. Bumpy and even means seed stitch. Twisted and raised means cables. Holes mean lace.
Follow the dominant lines: Ask yourself — do the main lines in the fabric run vertically (ribbing, cables), horizontally (garter, stripes), or diagonally (twisted cables, certain lace patterns)? The dominant direction is your first clue.
Consider the garment type: Different parts of a garment typically use different stitches. The body might be stockinette while all edges are ribbed. An Aran sweater might combine stockinette panels, cable panels, and seed stitch dividers. Shawls often mix stockinette or garter backgrounds with lace borders.
Look at how the fabric behaves: Does it pull inward (ribbing, cables)? Lie flat (garter, seed stitch)? Curl at the edges (stockinette)? The physical behavior of knitted fabric provides strong clues even in a still photo.
When You Can't Tell
Sometimes a photo simply isn't clear enough, or the yarn is too textured or dark to reveal the stitch structure. This is normal and happens to every knitter.
When you're stuck:
- Look for other photos of the same garment from different angles or in better light
- Search for similar textures on Ravelry using the browse-by-technique filters, or explore Pinterest boards dedicated to specific stitch patterns
- Check Ravelry's pattern library — if you can identify the garment, the pattern page will tell you exactly which stitches were used
- Start with your best guess and swatch — you can always adjust once you see the fabric in your hands
- Use AI tools that can analyze images and suggest stitch patterns based on visual features
La Maille is one such tool that can parse a photo and suggest the construction method and stitch patterns involved, which is especially useful for complex garments where multiple techniques are combined.
Putting It Into Practice
The best way to sharpen your stitch identification skills is deliberate, regular practice with real fabric.
1. Look at a sweater in your own closet — pick it up, examine the texture, and name every stitch you see 2. Find a knitwear photo on Pinterest and try to identify the stitches before reading any caption 3. Browse pattern photos on Ravelry and compare what you see with the technique tags on each pattern 4. Take close-up photos of your own swatches and practice reading them from the image rather than from the fabric in hand
The more consistently you do this, the faster your brain builds a visual library. Experienced knitters can identify most common stitches in under three seconds — not because they have special talent, but because they have looked at thousands of examples.
Using This Skill
Stitch identification is not just an academic exercise. Once you can reliably recognize stitches from photos, you gain a set of practical capabilities that transform how you engage with knitting.
- Recreate garments you see and love without needing an exact pattern
- Troubleshoot problems in your own knitting by comparing your fabric to reference photos
- Better understand pattern instructions because the written abbreviations connect to visual reality
- Communicate clearly with other knitters about what you want to make or what went wrong
- Get better results from AI pattern generators by understanding what you are uploading and being able to evaluate the output critically
- Modify patterns confidently by substituting one stitch for another with a clear understanding of how the visual result will differ
Frequently Asked Questions
How do I identify a knitting stitch from a photo? Look for key visual characteristics: smooth Vs stacked in vertical columns indicate stockinette stitch, vertical raised ridges indicate ribbing, horizontal ridges on both sides of the fabric mean garter stitch, twisted braided ropes mean cables, and intentional holes forming a pattern indicate lace. Zoom into the photo as much as possible — individual stitch shapes become visible at high magnification and give you the most reliable information.
What's the difference between stockinette and garter stitch? Stockinette is smooth with V-shaped stitches on one side and horizontal bumps on the other, and the edges curl naturally. Garter stitch has horizontal ridges on both sides, does not curl, and is reversible. Garter stitch is also squishier and shorter per row than stockinette worked in the same yarn and at the same tension. Each visible garter ridge represents two rows of knitting.
How can I tell if a sweater has raglan or set-in sleeves? Raglan construction shows as diagonal lines of decreases running from the underarm up to the neckline at four points — both front and back, both sides. Set-in sleeves have curved seam lines that follow the shoulder and drop into a defined armhole. In a photo, look at the shoulder-to-neck transition: a diagonal line means raglan, a curved seam means set-in, and a seamless shoulder with short rows often means a top-down construction.
What is ribbing in knitting? Ribbing is a stitch pattern made by alternating vertical columns of knit and purl stitches in the same row. The most common types are 1x1 ribbing (K1, P1 repeated) and 2x2 ribbing (K2, P2 repeated). Ribbing is highly elastic — it can stretch significantly and spring back — which makes it ideal for cuffs, waistbands, necklines, and any edge that needs to fit snugly without binding.
What is the difference between seed stitch and ribbing? Both are made from alternating knit and purl stitches, but the arrangement differs. In ribbing, knit stitches sit above knit stitches and purl stitches sit above purl stitches, creating vertical columns. In seed stitch, each knit stitch sits above a purl stitch and vice versa, deliberately breaking the columns to create an even, scattered texture. Ribbing is stretchy; seed stitch is not. Ribbing shows vertical lines; seed stitch looks uniform and bumpy in every direction.
Can AI identify knitting stitches from photos? Yes. AI tools can analyze photos to identify stitch patterns and construction methods based on visual features. These tools are increasingly accurate for common patterns like stockinette, ribbing, garter, cables, and lace. For complex or unusual patterns, your own stitch knowledge helps you evaluate and refine the AI's suggestions. Understanding basic stitch identification makes you a smarter user of any AI knitting tool, because you can confirm the output makes sense before committing to a full project.
Ready to turn a photo into a full pattern? La Maille can analyze your image and generate knitting instructions — but knowing your stitches helps you verify the results, catch any errors, and make the adjustments that turn a generated pattern into something that works perfectly for you.