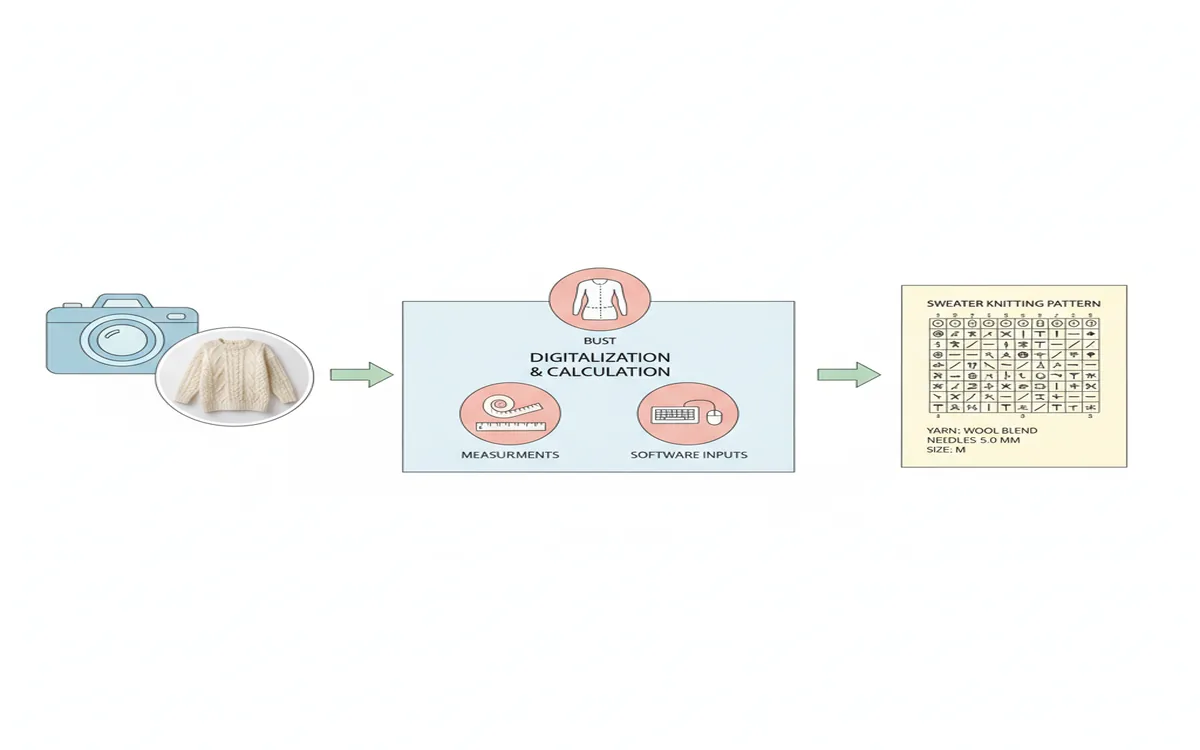
Yes, you can recreate any sweater from just a photo. With the right measurements, a carefully knit gauge swatch, and either manual calculations or AI-powered pattern generation tools like La Maille, knitters routinely turn inspiration photos into complete, custom-fitted patterns. This guide covers both traditional reverse-engineering methods and modern AI-assisted approaches — so you can finally knit that sweater you've been admiring for months.
Why Recreate Instead of Buy a Pattern?
Sometimes the perfect pattern simply doesn't exist. Maybe the sweater is vintage, discontinued, or a one-of-a-kind handmade piece spotted on someone at a café. Or perhaps you've found a commercial sweater you love but want to knit it yourself in a higher-quality yarn — or in a color that the brand never produced.
Recreating a knitting pattern from a photo gives you complete control over the fit, the yarn, and the details. You're not locked into someone else's sizing, ease preferences, or construction choices. You become the designer.
There's also a deeply practical reason: patterns go out of print. Vintage knitting books disappear, Ravelry designers remove their PDFs, and beloved patterns become unavailable overnight. Learning to copy a sweater pattern — even roughly — is one of the most valuable skills a knitter can develop. It transforms any sweater you see, whether in a museum, a magazine, or your grandmother's wardrobe, into a potential project.
Finally, recreating from a photo forces you to deeply understand garment construction. After working through even one reverse-engineered pattern, you'll look at every sweater differently — seeing increases, decreases, and shaping choices that used to be invisible.
What You Need to Get Started
Before you begin, gather these essentials:
A clear photo of the sweater. Front view is most important. Side and back views help but aren't strictly necessary. The photo should clearly show the overall silhouette, neckline shape, sleeve style, and any visible stitch patterns or texture. The higher the resolution, the better — you'll want to zoom in to identify stitch details.
Your body measurements. At minimum, you need bust, waist, hip, shoulder width, arm length, upper arm circumference, and desired body length. These measurements, combined with your preferred ease, will determine the actual dimensions of your knitted garment. Most fitted sweaters include 1 to 3 inches of positive ease at the bust; oversized styles may add 6 inches or more.
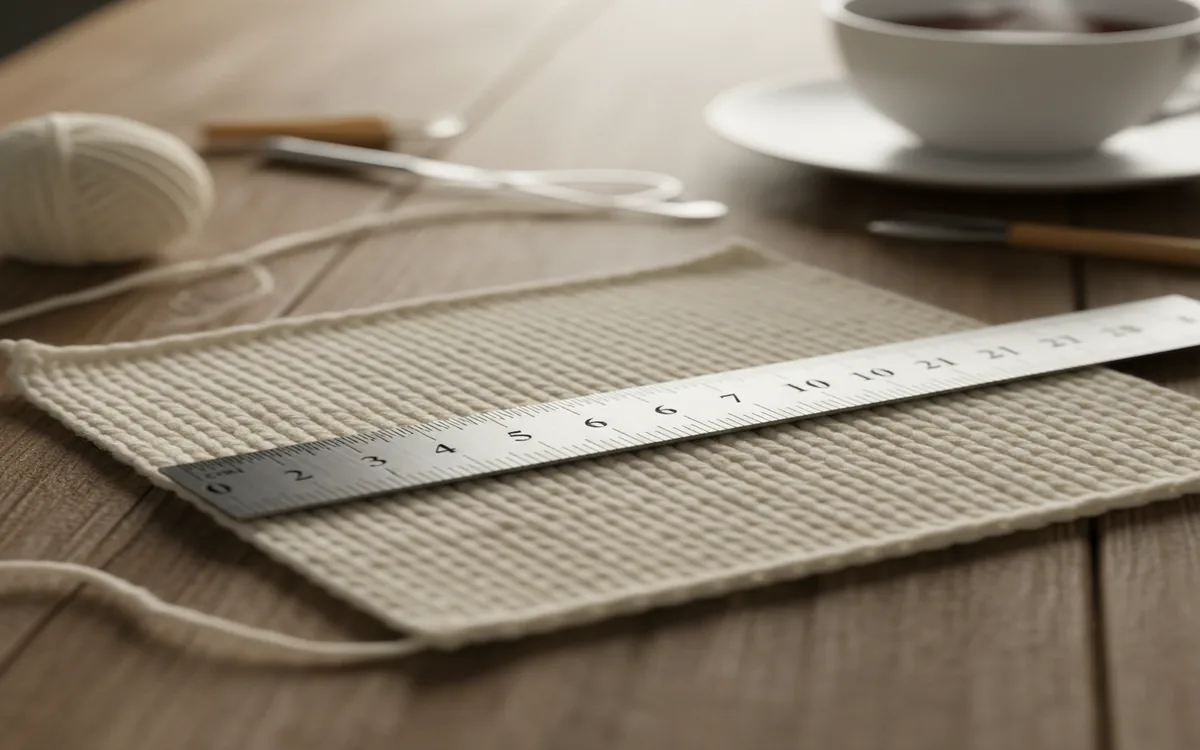
Your gauge swatch. Knit a swatch that measures at least 6x6 inches in your chosen yarn and on your chosen needles, then wash and block it exactly as you plan to treat the finished sweater. Once dry, measure a 4x4 inch area in the center and count your stitches and rows per inch. This number controls everything: a difference of even half a stitch per inch can cause a finished sweater to be 3 to 4 inches off in circumference on a standard adult size.
A basic understanding of sweater construction types. Even before you start your swatch, study the photo enough to identify the broad construction category. This shapes all your subsequent calculations.
The Traditional Method: Manual Reverse Engineering

Experienced knitters have been recreating patterns for decades using careful observation and arithmetic. It's a skill that takes practice, but it's deeply satisfying. Here's the full process broken down into manageable steps:
Step 1: Analyze the construction. Look at the photo carefully. Is it knit top-down or bottom-up? Seamed or seamless? The three most common sleeve constructions are raglan (diagonal shoulder seams), set-in sleeves (shaped armhole with a separate sleeve cap), and drop shoulder (no armhole shaping, sleeve attached to a straight body). Each requires a different mathematical approach. Raglan sweaters are generally the most forgiving and the best starting point for beginners to reverse engineering.
Step 2: Identify the stitch pattern. Zoom into the photo as much as possible. Stockinette (smooth, V-shaped knit stitches on the right side) is the most common and the easiest to replicate. Ribbing appears at hems, cuffs, and necklines as alternating vertical columns. Cables create twisted rope-like textures and require a stitch multiple (usually 6, 8, or 12 stitches per cable panel). Colorwork patterns — stripes, Fair Isle, or intarsia — will be visible as distinct color blocks or repeated motifs.
Step 3: Estimate proportions. Using the photo and your measurements, work out the key dimensions: body width at bust, waist, and hip; body length from hem to underarm; sleeve length from cuff to underarm; and sleeve width at the upper arm. If the person wearing the sweater in the photo is visible, you can use their proportions as reference points. For example, a standard adult torso from shoulder to hip is typically 24 to 27 inches, which gives you a useful scale reference.
Step 4: Do the math. Convert your measurements to stitch counts using your gauge. The core formula is simple: desired measurement in inches multiplied by your stitch gauge equals number of stitches. For example, if your gauge is 5 stitches per inch and you want a 40-inch bust circumference, you need 200 stitches around the body. For a 20-inch sleeve length at 7 rows per inch, you need 140 rows. Apply this logic to every section of the sweater and build a schematic — a simple diagram with all measurements and corresponding stitch counts labeled.
Step 5: Work out the shaping. Shaping is where manual reverse engineering gets complex. For raglan increases, a typical adult sweater knit top-down adds roughly 1 stitch on each side of each of the 4 raglan lines every other row for approximately 10 to 14 inches, depending on gauge and size. For waist shaping, decreases and increases are typically spaced over 2 to 3 inches each. Write out each shaping section explicitly before you begin knitting.
This method works beautifully, but it is time-consuming — expect to spend 2 to 6 hours on the math alone for a moderately complex design — and it requires meaningful experience to produce accurate results on the first try.
The Modern Method: AI Pattern Generation
New tools like La Maille can automate much of this process. You upload a photo, enter your measurements and gauge, and the AI generates a complete, row-by-row pattern customized to your body and your yarn.
This approach is particularly valuable for knitters who love the idea of custom, recreated patterns but don't have the time or mathematical confidence for complex calculations. It's also a powerful tool for speed: what takes an experienced knitter several hours manually can be generated in under 5 minutes with AI assistance.
The AI approach works best when the source photo is clear, well-lit, and shows the sweater's construction details. The more information visible in the image — neckline shape, sleeve style, overall proportions, stitch texture — the more accurate and detailed the generated pattern will be.
AI-generated patterns are also highly adaptable. Because the pattern is built from your measurements rather than a standard size chart, you get a truly custom fit from the start, without the need to grade between sizes or make extensive modifications.
Tips for Better Results
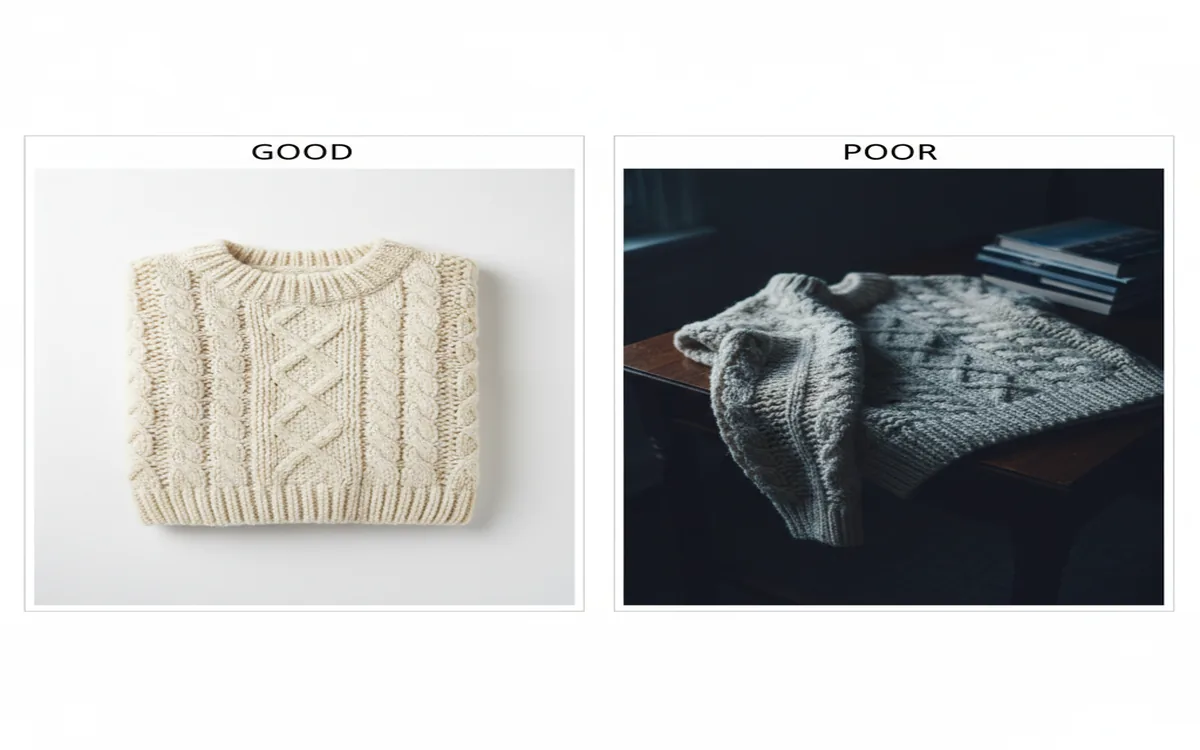
Choose clear, well-lit photos. Natural light is ideal. Blurry, dark, or low-contrast images make it significantly harder to identify stitch patterns, construction lines, and garment proportions — whether you're working manually or using AI tools.
Look for multiple angles. A front view alone can work for most projects, but a back view helps identify back neck shaping and any back panel details. A side view reveals whether the hem is straight or curved, and how much drape the fabric has.
Start simple. If you're new to recreating patterns, choose a basic drop-shoulder or raglan sweater in stockinette before attempting cables, colorwork, or complex construction. Master the principles first, then layer in complexity.
Swatch honestly. Knit your gauge swatch in the same stitch pattern you'll use for the sweater body, wash it with the same method you plan for the finished garment, and block it flat. Measure only after it's completely dry. Do not estimate your gauge from an unwashed swatch — many yarns, especially natural fibers like wool and alpaca, change significantly after washing.
Build a schematic. Even a rough hand-drawn diagram with key measurements and stitch counts labeled saves enormous time when you're mid-project and need to verify numbers. It also makes modifications much easier.
Keep detailed notes. Whether you're using manual calculations or an AI-generated pattern, document every decision you make. Note needle sizes, yarn lot numbers, any modifications, and your actual row counts as you knit. You'll thank yourself when you want to knit a second version or adjust the fit.
When to Use Each Method
Manual reverse engineering is the right choice when you genuinely enjoy the puzzle of deconstructing construction, have solid experience with pattern math and garment shaping, or want absolute control over every stitch count and shaping decision. It's also ideal when the sweater has unusual or complex construction that benefits from human interpretive judgment.
AI pattern generation shines when you want fast, accurate results without hours of calculation, when you're recreating multiple sweaters and efficiency matters, or when your math confidence is still developing. It's also excellent for knitters who have a clear vision of what they want to knit but prefer to spend their time knitting rather than calculating.
Many knitters use a hybrid approach: letting AI handle the initial pattern generation and stitch count calculations, then reviewing and tweaking the specific shaping, stitch patterns, or construction details manually. This combines the speed of automation with the nuance of human craftsmanship.
Common Mistakes to Avoid
Ignoring ease. Every sweater has a certain amount of ease built in — the difference between the body measurements and the actual garment measurements. The sweater in the photo was designed with a specific ease intention. Study the fit carefully: is it body-skimming, relaxed, or oversized? Adjust your target measurements accordingly before calculating stitch counts. A well-fitted sweater typically has 1 to 3 inches of positive ease; an oversized style may have 6 to 10 inches.
Misreading yarn weight. A chunky sweater knit at 2.5 stitches per inch and a fingering-weight sweater knit at 8 stitches per inch will have completely different stitch counts even for identical measurements. Make sure your chosen yarn weight is appropriate for the fabric you see in the photo — or consciously choose a different weight and recalculate everything from scratch.
Skipping the swatch. A half-stitch-per-inch difference in gauge sounds minor, but on a 40-inch bust circumference it translates to a 4-inch discrepancy. That's the difference between a sweater that fits beautifully and one that's unwearable. Swatch every time, for every project.
Underestimating row gauge. Knitters tend to focus on stitch gauge, but row gauge matters enormously for body length, sleeve length, and any vertical shaping. If your row gauge doesn't match the intended design, your armhole depths and waist shaping will land in the wrong place.
Not accounting for seams. If the original sweater is seamed and you're planning to knit it seamlessly (or vice versa), you'll need to adjust your stitch counts and construction approach. Seamed and seamless sweaters of the same size are not simply interchangeable.
Ready to Try It?
Whether you go the traditional manual route or use AI assistance, recreating a sweater from a photo is one of the most rewarding knitting projects you can undertake. You end up with a truly custom garment that fits your body, suits your taste, and was made in exactly the yarn you chose — and you gain the deep satisfaction of knowing you made it happen from just a picture.
The skills you build — reading garment construction, understanding ease, calculating gauge, working out shaping math — carry into every future project. Every sweater you knit after your first reverse-engineered project will benefit from what you learned.
Frequently Asked Questions
Can I recreate any sweater from a photo? Yes, in practice you can recreate the vast majority of sweaters from a clear photo. Simple stockinette designs with basic construction are the easiest and the best place to start. Complex cables, intricate colorwork, or unusual construction methods (such as short-row shoulders or entrelac) require more analysis and experience, but are absolutely achievable with careful study and, if needed, AI assistance to handle the calculations.
What measurements do I need to recreate a sweater? You need bust circumference, waist circumference, hip circumference, shoulder width, arm length from shoulder to wrist, upper arm circumference, wrist circumference, and desired body length from hem to shoulder. You also need your knitting gauge in both stitches per inch and rows per inch, measured from a washed and blocked swatch.
How long does it take to create a pattern from a photo? Manual reverse-engineering typically takes 2 to 6 hours for a moderately complex sweater, depending on your experience level and the complexity of the design. AI tools like La Maille generate complete, row-by-row custom patterns in under 5 minutes, based on your uploaded photo, your measurements, and your gauge.
Do I need the exact same yarn as the original sweater? No. You need to match the yarn weight category (fingering, sport, DK, worsted, aran, bulky, etc.) and then swatch to confirm your gauge matches the target. The fiber content — wool, cotton, acrylic, alpaca, or any blend — can differ based on your preference, though it may affect drape and how the finished fabric behaves.
What's the difference between a chart and a full pattern? A chart shows stitch placement visually, typically for a stitch pattern repeat or colorwork motif. A full pattern includes row-by-row written instructions, all shaping details, cast-on counts, measurements for each section, finishing instructions, and construction guidance from start to finish. La Maille generates complete patterns — not just charts — so you can begin knitting immediately without additional calculations.
How do I identify the construction type from a photo? Look at the shoulder area. Raglan sweaters show diagonal seam lines (or increase lines if seamless) running from the underarm to the neckline. Set-in sleeve sweaters show a distinct armhole curve and a separate, shaped sleeve cap. Drop-shoulder sweaters have no armhole shaping — the sleeve attaches to a straight body edge, and the shoulder seam sits slightly off the natural shoulder point. These three construction types each require different shaping calculations.
Can I recreate a sweater in a different yarn weight than the original? Yes, but you'll need to recalculate everything based on your new gauge. The stitch counts, row counts, and all shaping intervals will change. Think of the original photo as inspiration for the shape and design details — your gauge swatch in your chosen yarn is what actually determines the numbers in your pattern.
Want to turn your photo into a pattern right now? Try La Maille — upload a photo, enter your measurements, and get a complete custom pattern in minutes.