Accurate body measurements are the single most important factor in knitting a sweater that fits well. Standard sweater ease ranges from 2–4 inches for a comfortable fit, which means even small measurement errors compound into noticeable fit problems. Whether you're following a published pattern or generating a custom one with La Maille, your measurements are the foundation of every stitch count, every shaping calculation, and every row count. Here's exactly how to measure yourself correctly — and why each number matters more than you might think.
Why Measurements Matter More Than Size Charts
Pattern sizes (S, M, L, XL) are based on standardized body measurements developed decades ago that may not reflect the full diversity of real bodies. The "medium" in one pattern might fit a 36-inch bust; in another, it's designed for 40 inches. This inconsistency isn't a flaw — it's simply a reflection of the fact that every designer and publisher uses different sizing conventions.
Your actual measurements tell the truth. Size labels are shorthand. When you know your numbers, you gain real control over your knitting:
- You can choose the right pattern size with confidence, rather than guessing
- You can modify patterns for a custom fit — adding length, adjusting width, reshaping the sleeves
- You can use tools like La Maille to generate patterns that fit your exact body, skipping the size chart entirely
- You can troubleshoot fitting problems in future projects by looking at your measurements rather than blaming the pattern
Knitters who measure accurately before casting on spend far less time ripping out and re-knitting. That's not a small thing when a sweater can represent 40 or more hours of work.
Essential Measurements for Sweaters
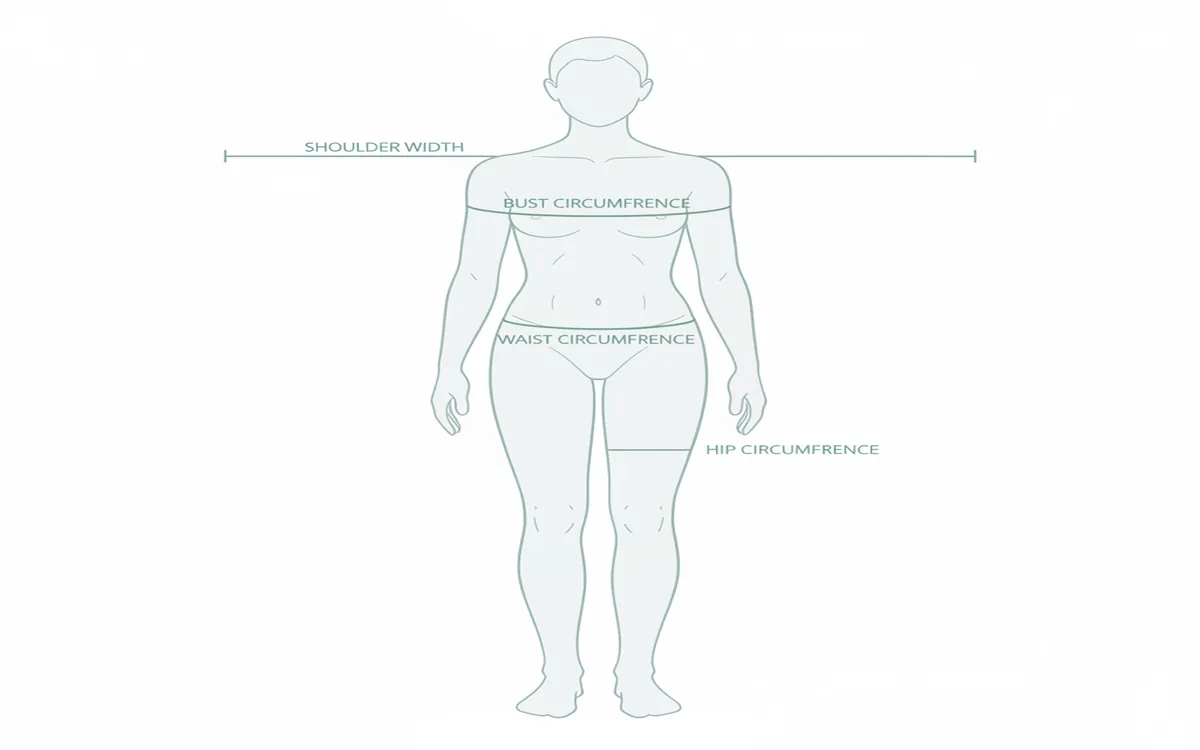
You'll need these core measurements for most sweater patterns. Keep in mind that circumference measurements are taken all the way around, not just across one side.
Bust/Chest Circumference
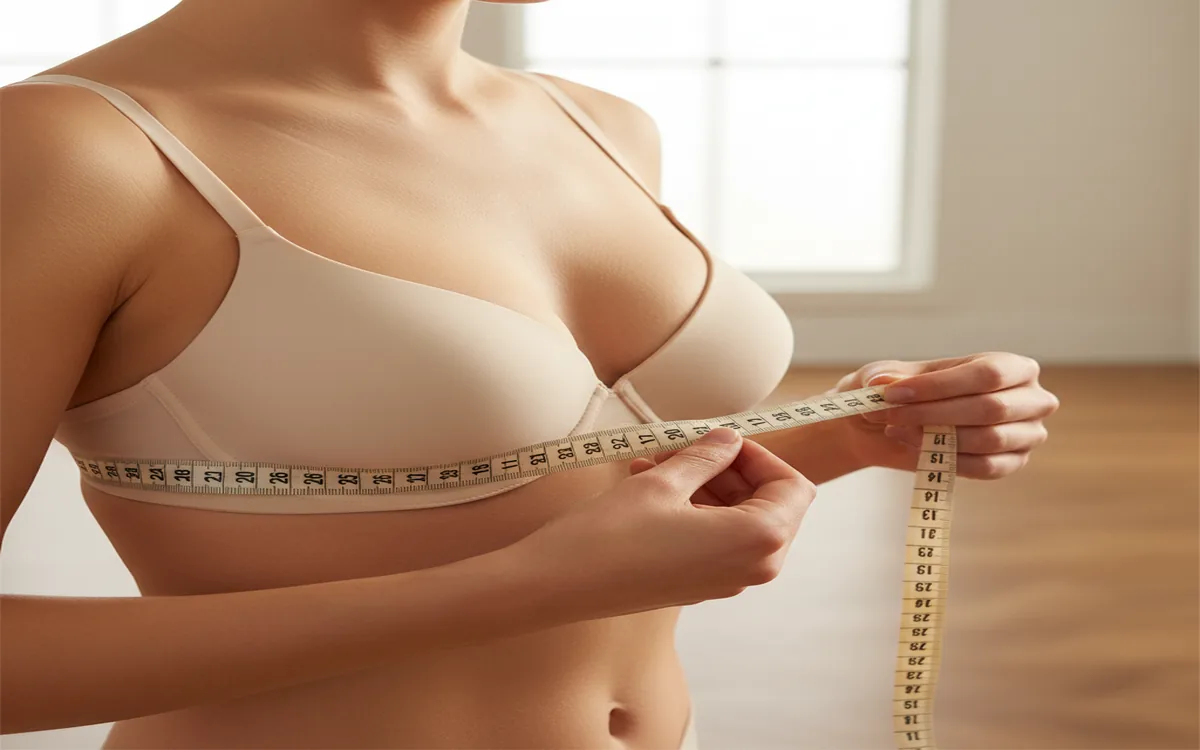
How to measure: Wrap the tape measure around the fullest part of your bust or chest, keeping it parallel to the floor. Don't pull tight — the tape should be snug but not compressing or creating a dent in your skin.
Why it matters: This is the primary measurement that determines your pattern size. Nearly every sizing decision in a sweater pattern flows from the bust circumference. If you take only one measurement, make it this one.
Common range: For adult knitters, bust measurements typically fall between 30 and 52 inches, though patterns increasingly cater to a wider range than they once did.
Waist Circumference
How to measure: Measure around your natural waist — the narrowest part of your torso, usually just above your belly button. Bend sideways to find where your body naturally creases; that's your natural waist.
Why it matters: Important for fitted sweaters with waist shaping. If a pattern includes waist decreases and increases to create an hourglass silhouette, this measurement tells you how dramatic that shaping needs to be. Less critical for boxy, dropped-shoulder, or oversized styles.
Tip: If your waist and bust measurements are close in number, waist shaping may not be worth the added complexity. Many knitters skip waist shaping on sweaters with 4 or fewer inches of difference.
Hip Circumference
How to measure: Measure around the fullest part of your hips and bottom, keeping the tape parallel to the floor. This is usually 7–9 inches below your natural waist.
Why it matters: If your sweater extends below the waist — which most do — hip measurement ensures the fabric won't pull, ride up, or feel uncomfortably snug across the lower body. Even a relaxed sweater will pull awkwardly if the hip isn't accounted for.
Shoulder Width
How to measure: Measure from the edge of one shoulder to the other, across your upper back. The "edge" is where your arm meets your shoulder — the point where a set-in sleeve seam would naturally sit.
Why it matters: Determines where sleeves attach and directly affects how a sweater falls across the upper body. A sweater with shoulders that are too wide will look droopy and oversized in a way that reads as ill-fitting rather than intentional. Shoulders that are too narrow create a pulling sensation across the upper back.
Arm Length
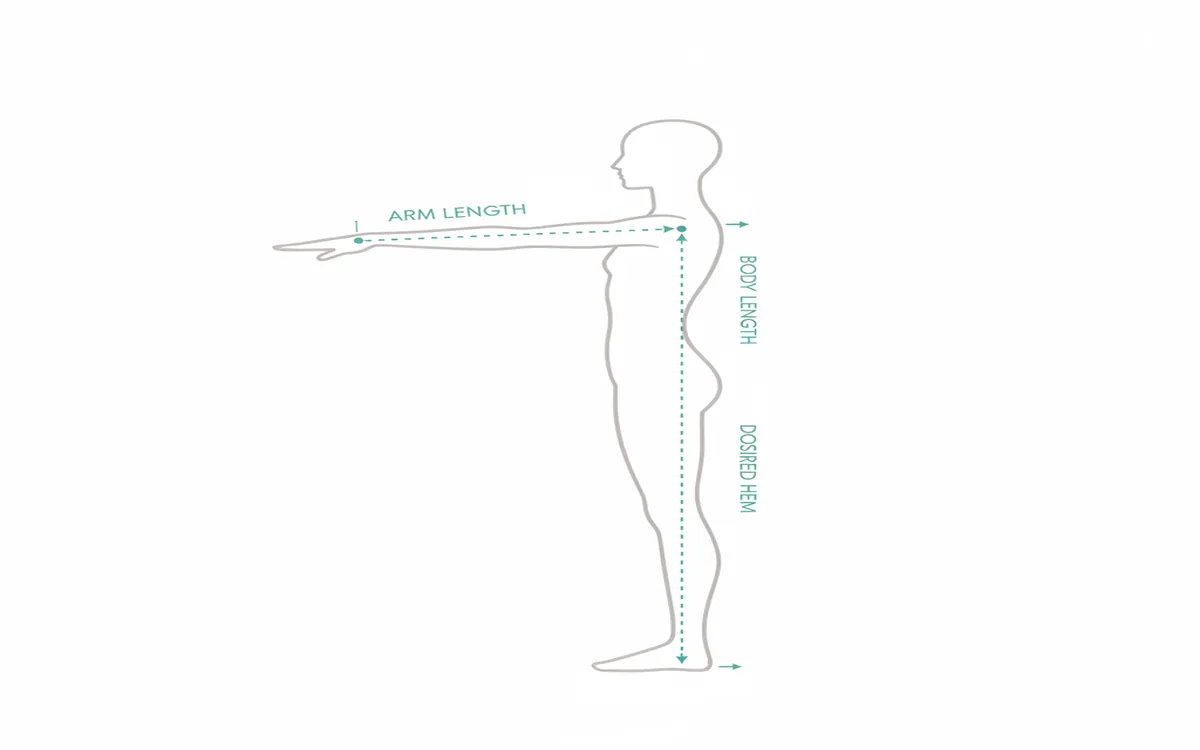
How to measure: Bend your elbow slightly. Measure from the edge of your shoulder, down over your elbow, to your wrist bone. The slight bend ensures the sleeve won't be too short when you reach forward.
Why it matters: Ensures sleeves are the right length. A sleeve that ends mid-forearm can undermine the entire appearance of an otherwise well-fitting sweater. Arm length varies significantly from person to person even when bust measurements are identical.
Tip: If you have longer or shorter arms relative to your bust size, you'll almost always need to adjust sleeve length in commercial patterns. Knowing your number makes that adjustment straightforward.
Upper Arm Circumference
How to measure: Measure around the fullest part of your upper arm, usually 1–2 inches below the armpit.
Why it matters: Ensures sleeves aren't too tight. The upper arm is one of the most commonly underestimated measurements in sweater knitting, and a sleeve that fits everywhere else but binds at the upper arm is genuinely uncomfortable to wear. Add at least 1–2 inches of ease here for comfortable movement, more if you prefer a relaxed sleeve.
Body Length
How to measure: Measure from the top of your shoulder (where a sweater seam would sit) down to where you want the hem to fall. Common hem positions include hip-length (about 24–26 inches for many adults), waist-length (a cropped style), or below-hip tunic length.
Why it matters: Determines overall sweater length and how the finished garment will feel to wear. Consider your torso proportions here — long-waisted people often need to add 1–2 inches to the body length stated in a pattern.
Optional But Helpful Measurements
These measurements aren't required for every pattern, but they become valuable when you're modifying patterns or working with fitted constructions.
Cross-Back Width
How to measure: Measure across your upper back from armpit to armpit, at the level where your arms meet your torso.
Why it matters: Helps ensure the back panel isn't too wide or narrow, especially for set-in sleeve constructions where the back width is calculated separately from the front. A back that's too wide can create fabric pooling between the shoulder blades.
Neck Circumference
How to measure: Measure around the base of your neck where a crew neckline would sit — this is at the base, not the throat.
Why it matters: Useful for fitted necklines, turtlenecks, and cowl necks. Not needed for most standard crew or v-neck patterns where the neckband simply has enough stretch to go over your head.
Armhole Depth
How to measure: Measure from the top of your shoulder down to the level of your armpit. This is somewhat tricky to do alone; a helper makes it much easier.
Why it matters: Affects comfort and range of motion in a significant way. Deeper armholes (5 inches or more) feel relaxed and allow easy movement. Shallower armholes (3–4 inches) are more fitted but can feel restrictive when raising your arms. If you've ever had a sweater that pulled every time you reached for something, too-shallow armholes were likely the culprit.
Tools You'll Need
Flexible tape measure: The soft, fabric-style kind used for sewing. A dressmaker's tape is ideal. Do not use a metal construction tape measure — it won't bend around your body correctly.
A friend: Some measurements are genuinely difficult to take accurately on your own, particularly shoulder width, cross-back width, and armhole depth. If you can recruit a helper, the process takes under ten minutes and the results are far more reliable.
A mirror: If measuring alone, a full-length mirror helps you check that the tape is sitting level and positioned correctly.
Paper and pen: Write every measurement down immediately. Don't trust your memory — not even for five minutes.
How to Get Accurate Results
Wear fitted clothing: Measure in underwear or a thin, close-fitting layer. Leggings and a fitted tank top work well. Bulky clothes add real inches to your measurements.
Stand naturally: Don't suck in your stomach or puff out your chest. Stand how you normally stand when you're not thinking about it. Your sweater needs to fit your everyday posture, not your best posture.
Keep the tape parallel: For every circumference measurement, the tape should be level all the way around — not lower in the back than the front, not tilted.
Measure twice: Take each measurement at least twice. If your two results differ by more than half an inch, measure a third time and take the middle value.
Don't pull tight: The tape should touch your body all the way around but not compress or indent your skin. You should be able to slide one finger beneath it.
Common Measurement Mistakes
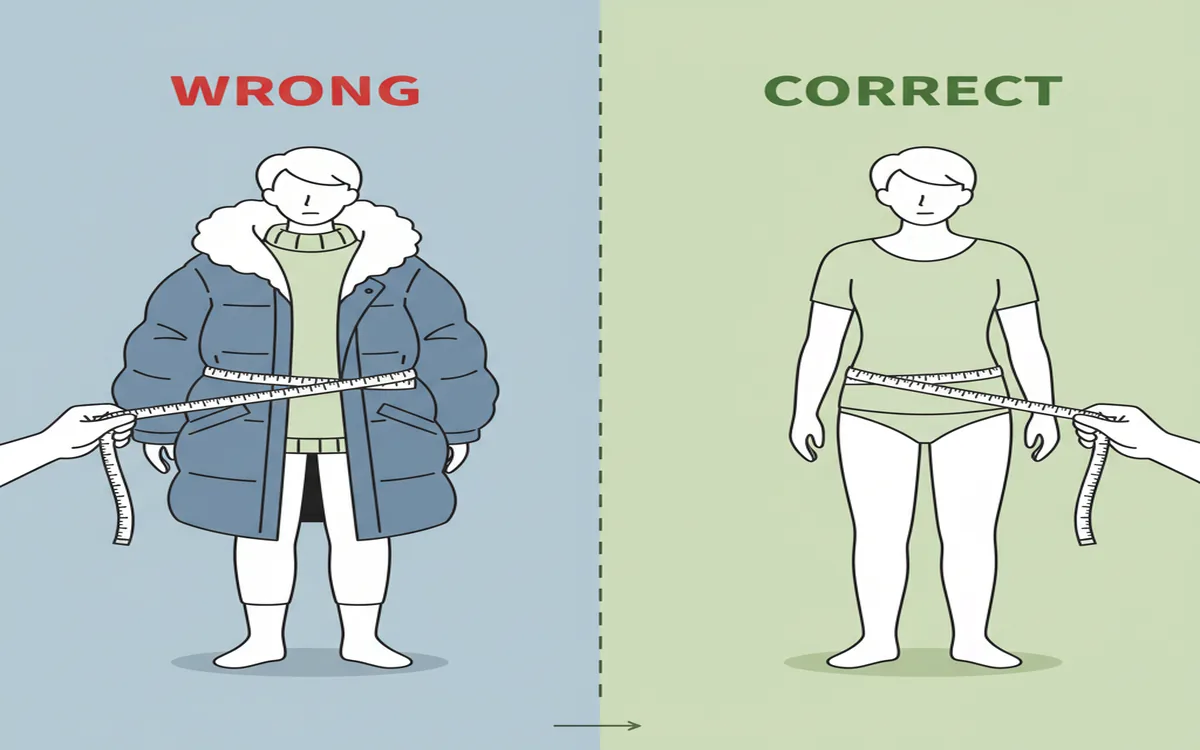
Measuring over bulky clothes: Adds 1–2 inches to every circumference measurement. Always measure close to the body.
Holding your breath: Breathe normally throughout. A sweater you can only wear while not breathing isn't practical for daily life.
Letting the tape droop in the back: This is extremely common when measuring alone. The tape often drops lower in the back, adding false inches to your bust and hip measurements. A mirror or helper prevents this.
Measuring your favorite sweater instead of your body: Your favorite sweater's measurements already include ease — sometimes several inches of it. Body measurements must reflect your actual body, not a garment you happen to like.
Rounding casually: If your bust measures 38.5 inches, write down 38.5 — not 38, not 39. That half inch can represent 4–6 stitches at typical sweater gauges, which is meaningful.
Forgetting to write it down: You will not remember that your upper arm is 13.5 inches tomorrow. Or next week. Write everything down immediately.
From Measurements to Pattern
Once you have your measurements, the path from numbers to stitches becomes clear.
Compare to pattern sizing: Most patterns include a finished measurements chart alongside the size chart. Compare your bust measurement plus your desired ease to the pattern's finished bust measurement to select your size. You're choosing based on finished garment dimensions, not body dimensions alone.
Calculate ease: Ease is simply the difference between your body measurement and the finished garment measurement. 2–4 inches of positive ease at the bust gives a comfortable, everyday fit. 6 or more inches is deliberately oversized. 0–1 inch is close-fitting and will emphasize your shape. Negative ease (the garment is smaller than your body) is used in stretchy fabrics and fitted ribbing.
Plan your modifications: If your body length is 26 inches but the pattern's medium is written for 24 inches, you know before you cast on that you'll need to add 2 inches to the body. Measurements make these decisions easy.
Generate custom patterns: Tools like La Maille use your exact measurements and gauge to create patterns built for your body from the ground up — no size chart, no size selection, no modification required.
Recording Your Measurements
Keep your measurements somewhere permanent and easy to find:
- The notes app on your phone
- A dedicated knitting notebook
- A spreadsheet you can share with yourself across devices
Label everything clearly. "Bust: 40 inches, measured November 2024" is far more useful than a number with no context. Update your measurements at least annually, or any time your body changes significantly. Bodies change — that's normal and nothing to feel self-conscious about. Accurate current measurements simply ensure well-fitting garments.
Measurements for Different Fit Styles
The same body measurements can produce completely different-looking sweaters depending on how much ease you choose to add. Ease is a design decision, not just a sizing variable.
Close-fitting: 0–2 inches of ease at bust. The fabric skims your body. Works best in knit fabrics with some stretch or drape.
Standard fit: 2–4 inches of ease. Comfortable, not tight or loose. The most common choice for everyday sweaters.
Relaxed fit: 4–6 inches of ease. Room to move, to layer a shirt underneath, and to feel unrestricted throughout the day.
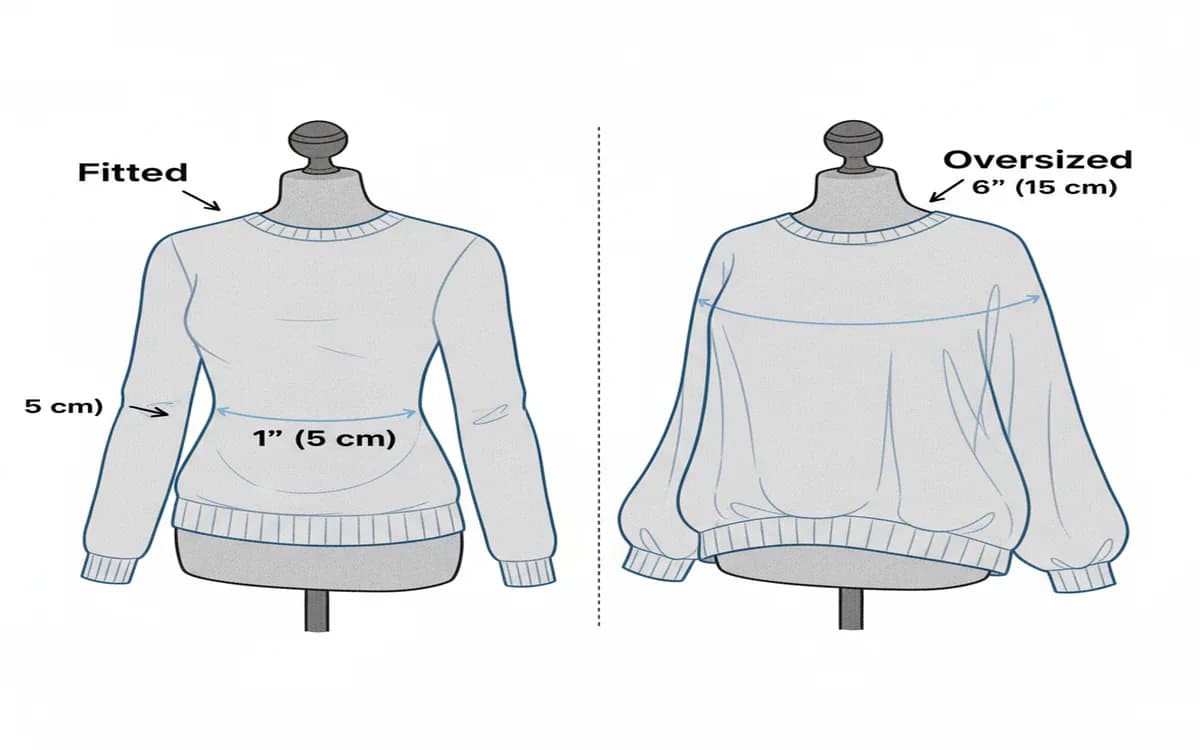
Oversized: 6 or more inches of ease. Deliberately loose, drapey, and cozy. This is a style choice, not an error.
When choosing pattern sizes or generating custom patterns, decide what fit style you're aiming for first, then add the appropriate ease to your body measurements to find your target finished bust. For example, a 38-inch bust plus 4 inches of ease means you want a finished sweater with approximately 42 inches at the bust.
Understanding Ease Across Different Body Parts
While bust ease gets the most attention in knitting discussions, ease matters at every point of the garment. Upper arm ease of 2–4 inches ensures you can bend and move comfortably. Hip ease of 2–4 inches prevents the sweater from riding up when you sit. Sleeve length ease of 0–1 inch accounts for the fact that sleeves naturally ride up slightly during movement.
When reading a pattern's finished measurements table, check the ease across all listed dimensions — not just the bust. A pattern may have generous bust ease but very little upper arm ease, or vice versa. Understanding this before you cast on prevents unpleasant surprises at the finishing stage.
Frequently Asked Questions
What measurements do I need for a knitted sweater? For most sweater patterns, you need: bust circumference, waist circumference, hip circumference, shoulder width, arm length, upper arm circumference, and desired body length. Optional but helpful measurements include cross-back width, neck circumference, and armhole depth. Having all of these on hand means you can work with virtually any pattern without needing to pause and measure yourself mid-project.
How do I measure my bust for knitting? Wrap a flexible tape measure around the fullest part of your bust, keeping it parallel to the floor at all points — including the back, where it tends to droop if you're measuring alone. Keep the tape snug against your body but not compressing your skin. Breathe normally. This measurement is your primary sizing number for almost every sweater pattern.
Should I measure over clothes? No. Always measure in underwear or thin, close-fitting clothing. Bulky fabrics, sweaters, or even a standard t-shirt can add 1–2 inches to circumference measurements. Since most sweater patterns have just 2–4 inches of ease built in, inaccurate measurements over clothing can push you into the wrong size or produce a garment that feels uncomfortably tight.
What's the difference between body measurements and finished measurements? Body measurements are your actual body dimensions. Finished measurements are the dimensions of the completed garment, which are always larger (for standard fit) to account for ease. A knitter with a 38-inch bust might choose a sweater with 42 inches of finished bust — that 4-inch difference is the ease. When comparing yourself to a pattern's size chart, check whether the chart lists body measurements or finished measurements, as patterns vary on this point.
How often should I update my measurements? Annually is a good baseline, or any time you notice your body has changed significantly. Bodies change with age, fitness levels, pregnancy, and simply over time — that's completely normal. Keeping measurements current means you won't start a large project based on outdated numbers, which is a frustrating and avoidable problem.
Do I need different measurements for different sweater constructions? The core measurements remain the same, but some constructions use additional ones. Top-down raglan sweaters rely heavily on neck circumference and shoulder slope. Set-in sleeve constructions benefit from accurate armhole depth and cross-back measurements. Yoke sweaters care most about bust and neck circumference. Taking a complete set of measurements from the start means you're prepared for any construction type.
Ready to Use Your Measurements?
With accurate measurements in hand, you can confidently choose pattern sizes, modify existing patterns to fit your proportions, or generate custom patterns that fit your body from the very first row.
Try La Maille — enter your measurements and gauge, upload a photo of any sweater you love, and get a pattern made precisely for your body. No more choosing between two sizes and hoping for the best.