You can convert any photo into a complete knitting pattern by analyzing construction, identifying stitch patterns, and calculating stitch counts from your gauge. The process involves five core steps: reading the garment's structure from the image, identifying the stitch patterns at work, taking your body measurements, knitting a gauge swatch, and performing the math to calculate cast-on counts and shaping. With over 70% of knitters searching for patterns online, tools like La Maille now automate this entire process — generating row-by-row instructions from a single photo. This guide covers both the manual method and the modern AI-assisted approach, step by step, so you can choose the path that works best for you.
Understanding the Challenge
A photograph shows you what a sweater looks like, but it doesn't tell you how to make it. The gap between "I love that sweater" and "I can knit that sweater" is bridged by pattern engineering — the skill of reverse-translating a finished object back into instructions. To create a knitting pattern from a photo, you need to figure out four distinct things:
- Construction method: How was it assembled? Top-down, bottom-up, knit in pieces, or seamlessly in the round?
- Stitch patterns: What stitches create that texture? Stockinette, ribbing, cables, lace, colorwork?
- Shaping: Where are the increases and decreases? How is the neckline formed? Is there waist shaping?
- Proportions: How do the visual measurements translate to your size and gauge?
Each element requires its own analysis. A sweater that looks simple — say, a classic crew-neck pullover — can still involve subtle waist shaping, a set-in sleeve cap with 12 or more shaping rows, and a neckline picked up at approximately 90% of its actual circumference to sit correctly. Understanding these details before you cast on saves hours of frogging later.
Step 1: Analyze the Construction
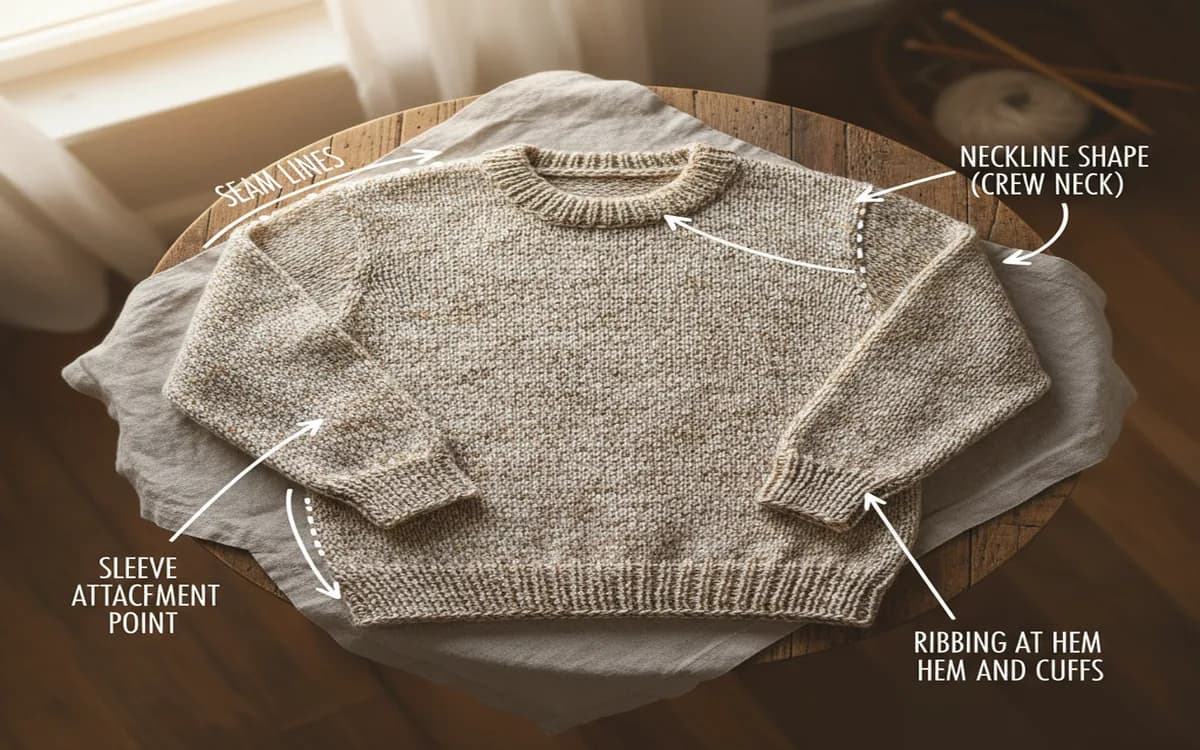
Look at your photo carefully and ask targeted questions about how the pieces relate to each other.
Seams or seamless? Look for visible seam lines along the sides and shoulders. If you can see them, the sweater was likely knit flat in pieces and sewn together. If the fabric flows continuously without interruption, it's probably seamless — either worked in the round from the bottom up, or top-down as a single unit.
Top-down or bottom-up? This is often the trickiest thing to determine from a photograph. Look at the direction of any visible decrease lines. In a top-down raglan, the diagonal lines angle outward from the neckline downward. In a bottom-up design, those lines run the other way. The way ribbing sits at the hem can also hint at direction — though experienced knitters know ribbing looks similar either way.
Sleeve construction? The three main types each leave a visual signature:
- Set-in sleeves: A curved, fitted seam around the armhole creates a clean, tailored shoulder line
- Raglan: Diagonal seam lines — or decrease lines in a seamless version — run from the underarm to the neckline at roughly a 45-degree angle
- Drop shoulder: The shoulder seam sits noticeably below the natural shoulder line, creating a relaxed, boxy silhouette with no armhole shaping at all
- Yoke construction: A circular yoke with evenly spaced decreases, common in Icelandic and Scandinavian-style sweaters
Getting the construction right before you start calculating is essential, because different constructions require entirely different shaping sequences and stitch count logic.
Step 2: Identify Stitch Patterns
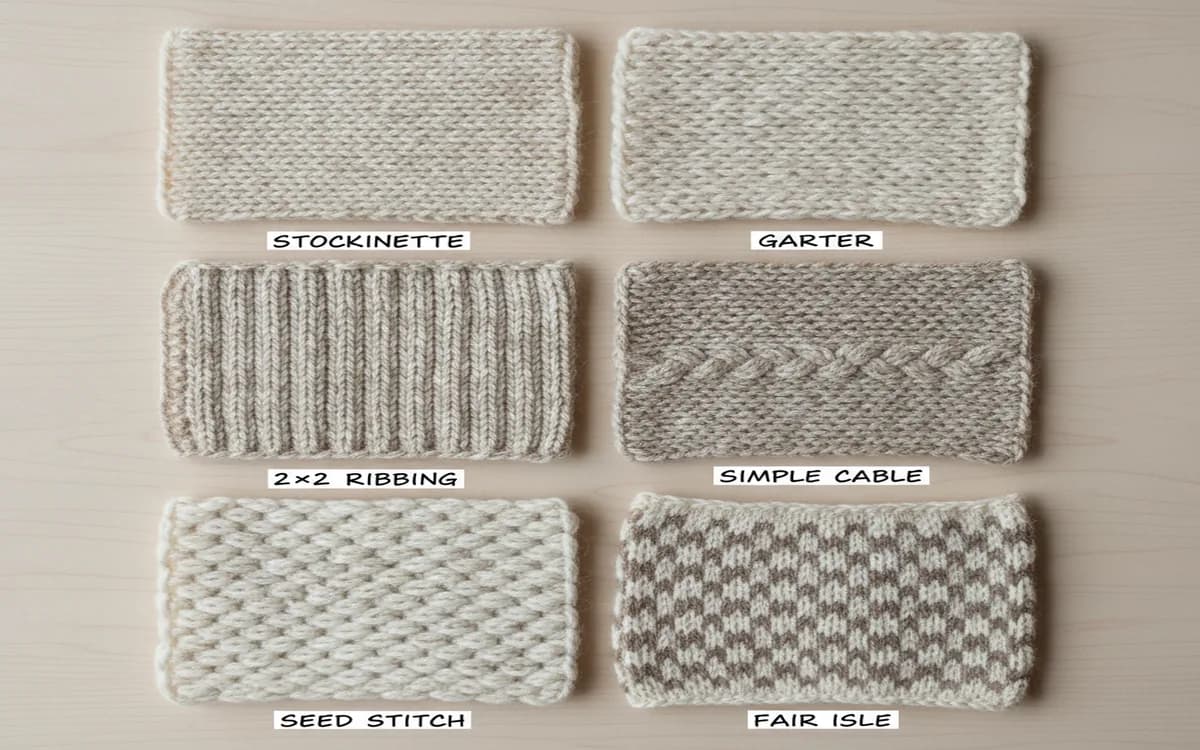
Zoom in on your photo as far as resolution allows. Look for repeated texture units — these are your stitch repeats. Common stitch patterns and how to recognize them include:
Stockinette: Smooth, interlocking V-shaped stitches on the right side, bumpy horizontal ridges on the wrong side (the purl side). This is the most common fabric for sweater bodies. From a photo, it reads as a clean, flat surface with a slight diagonal grain.
Ribbing: Alternating vertical columns of knit and purl stitches. Under tension (like at a cuff or hem), ribbing contracts and looks very dense. Relaxed, it opens up. Typical patterns are 1x1 (one knit, one purl) or 2x2 (two knit, two purl). It's almost always used at cuffs, hems, and necklines — usually about 1 to 2 inches deep at cuffs, 2 to 3 inches at hems.
Cables: Twisted, rope-like structures where groups of stitches cross over each other on a background of reverse stockinette. Cable width is measured in stitches — a 6-stitch cable is one of the most common sizes. If you can count the ridges in a cable column, you can estimate its width and crossing frequency.
Garter stitch: Horizontal ridges running across the fabric. Unlike stockinette, garter is worked as all knit rows (flat) or alternating knit and purl rows (in the round). It's thicker and squarer in gauge than stockinette.
Colorwork: Patterns created with two or more colors per row. Stranded colorwork (Fair Isle) creates a double layer of fabric with floats on the inside. Intarsia uses separate yarn bobbins for large color blocks with no floats. Stripes are the simplest form — full rows or rounds in alternating colors.
If you can't identify a specific stitch pattern from the photo, search for similar textures in a stitch dictionary like the Harmony Guides or the Vogue Knitting Stitch Dictionary, or use Ravelry's advanced search to find patterns tagged with the texture you're trying to match.
Step 3: Take Your Measurements
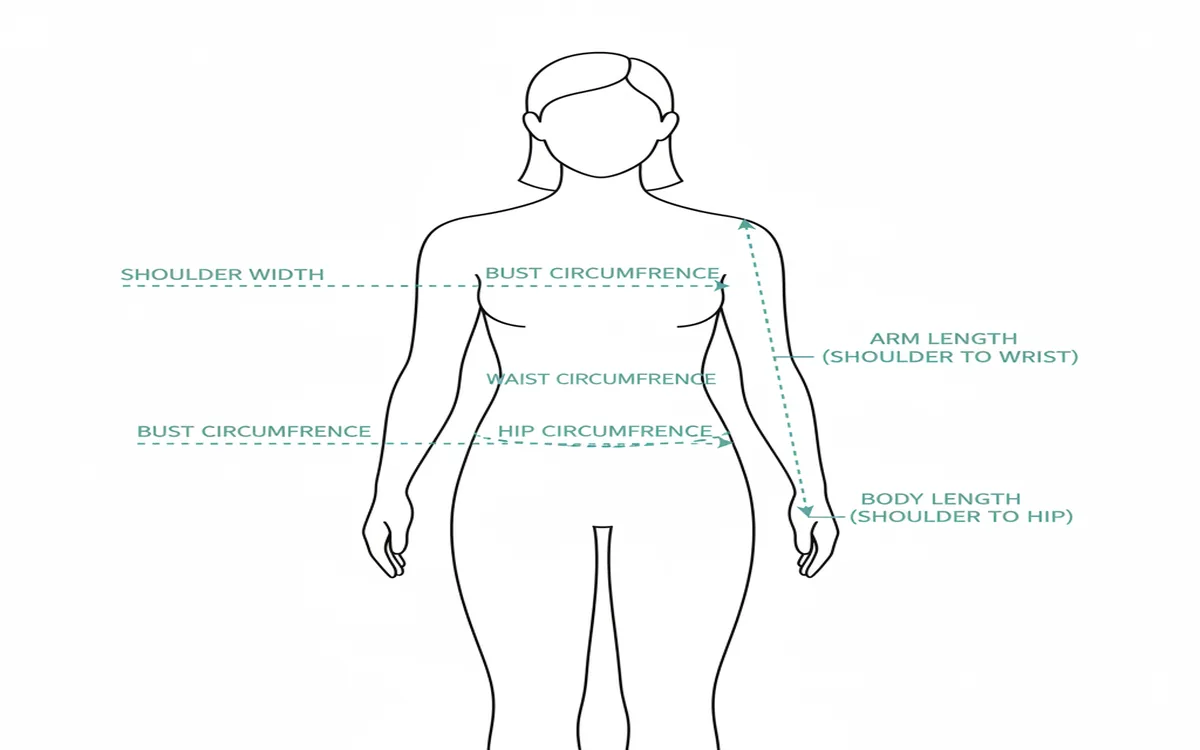
Accurate measurements are the foundation of a well-fitting hand-knit garment. Rushing this step is one of the most common reasons knitters end up with a sweater that doesn't fit. Measure yourself (or the intended recipient) carefully, ideally in close-fitting clothing:
- Bust/chest circumference: Measured at the fullest point
- Waist circumference: At the natural waist, if the sweater has fitted shaping
- Hip circumference: At the fullest point, typically 8 to 10 inches below the natural waist
- Shoulder width: Straight across the back from shoulder seam to shoulder seam
- Arm length: From the top of the shoulder (or underarm, depending on sleeve construction) to the wrist
- Upper arm circumference: At the widest point, usually 1 inch below the armpit
- Wrist circumference: For fitted cuffs
- Body length: From shoulder to desired hem
Once you have these numbers, decide on your ease — the intentional difference between your body measurements and the finished garment dimensions. A close-fitting sweater typically has 1 to 2 inches of positive ease at the bust. A standard, relaxed fit uses 2 to 4 inches. An oversized or cozy style might use 6 to 8 inches or even more. Looking at the original photo can tell you a lot about the intended ease: does it drape loosely or sit close to the body?
Step 4: Knit Your Gauge Swatch
This step is non-negotiable, and every experienced knitter who has ever skipped it has regretted it. Your gauge — the number of stitches and rows per inch — controls every single measurement in your pattern. Being off by even half a stitch per inch across a 40-inch bust creates a 5-stitch difference, which can mean a 1-inch error in your finished circumference.
Knit a swatch at least 6 inches square (some knitters prefer 8 inches to get a more stable reading away from the edges) in your chosen yarn, with the needle size you plan to use, in the main stitch pattern of the sweater. This matters — your gauge in stockinette may differ from your gauge in a textured pattern.
Wash and block the swatch the same way you'll treat the finished sweater. Wet blocking especially can change gauge dramatically — sometimes by as much as 10 to 15% in certain yarn fibers. Let it dry completely, then measure in multiple places and average the results. Record stitches per inch and rows per inch separately — row gauge matters for length calculations even though many knitters focus only on stitch gauge.
Step 5: Calculate Your Pattern
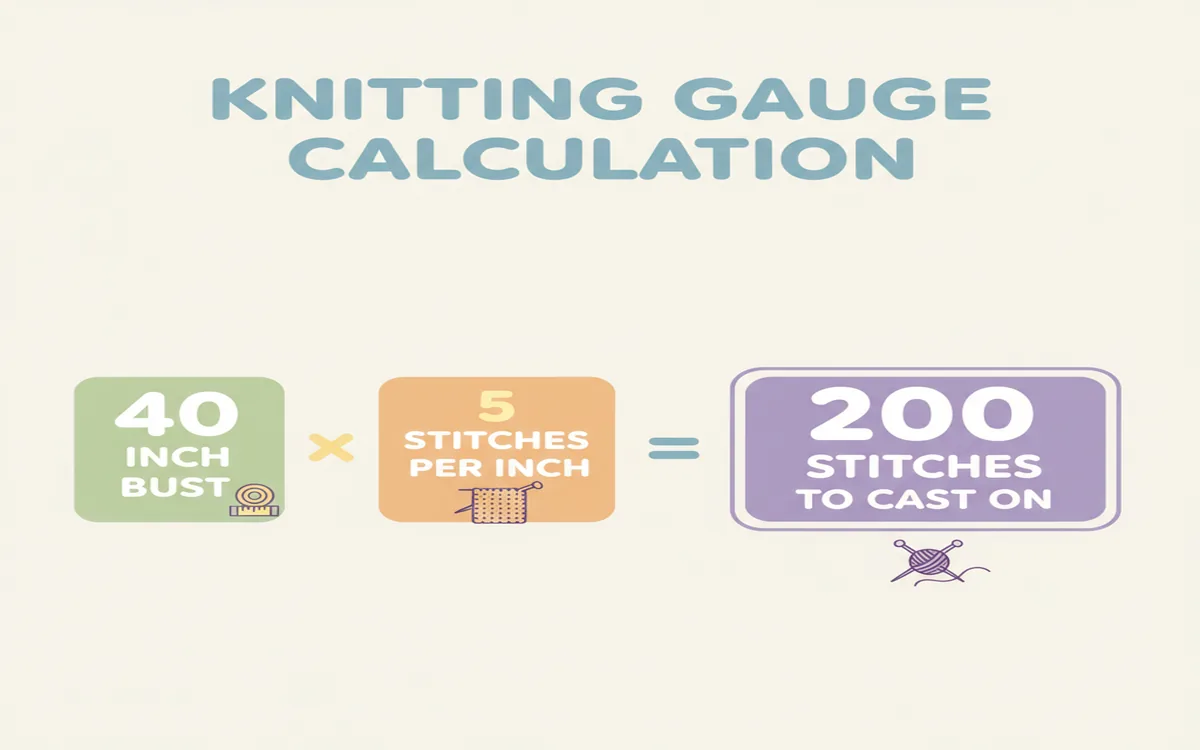
With your measurements and gauge in hand, the math becomes straightforward multiplication and division. Here's the core logic:
Cast-on stitches: Finished circumference in inches × stitches per inch = total stitches needed
Length in rows: Desired length in inches × rows per inch = number of rows to work
Shaping calculations: Determine how many stitches to increase or decrease, and over how many rows, to achieve the required shape change.
A practical example: If your target finished bust is 40 inches and your gauge is 5 stitches per inch, you need 200 stitches total for the body. Knitting in the round means 200 stitches on your needle at once. Knitting flat in two pieces (front and back) means 100 stitches each. If you want waist shaping that reduces the circumference by 2 inches (10 stitches total), you'll decrease 10 stitches over the course of about 3 to 4 inches of fabric, then re-increase them above the waist.
For sleeve caps — one of the more mathematically involved parts of garment construction — you typically bind off approximately 10% of sleeve stitches at the underarm, then shape the cap over a height that equals roughly 75% of the armhole depth, ending with about 30% of the original stitch count before a final bind-off.
The AI Shortcut
All of this analysis and calculation can absolutely be done by hand — and many experienced knitters genuinely enjoy the puzzle. But if you want faster results, or if garment math isn't your strength, AI tools like La Maille can analyze your photo and generate a complete, personalized pattern automatically.
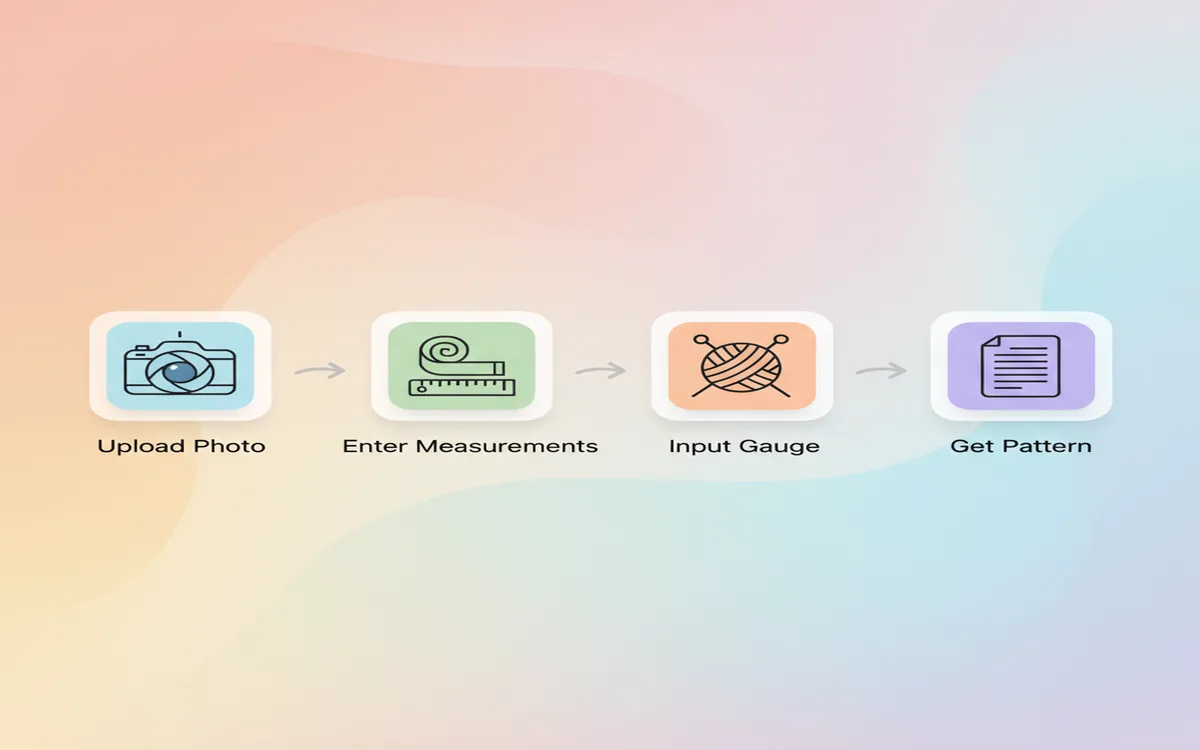
Here's the workflow:
1. Upload a clear photo of the sweater you want to recreate 2. Enter your body measurements 3. Enter your gauge (from your swatch) 4. The AI identifies the construction type, estimates proportions from the image, and generates row-by-row instructions
You get a complete, mathematically consistent pattern in minutes rather than hours. The AI handles the proportion estimation and shaping calculations that would otherwise require considerable experience to work through manually. This makes the photo-to-pattern process accessible even to intermediate knitters who might not yet feel confident engineering a garment from scratch.
What Makes a Good Source Photo
Not all photos work equally well for pattern generation, whether you're analyzing manually or using AI. The best source photos share these characteristics:
- Clear, even lighting: No harsh shadows that obscure seam lines or texture details
- Front view: Shows the complete silhouette, neckline shape, and body proportions
- Sufficient detail: Close enough that stitch texture is visible if there's a pattern element
- Neutral background: Helps define the sweater's edges cleanly
- Worn on a person (optional but useful): Gives scale and shows how the garment fits and drapes
If you have access to multiple photos of the same garment — front, back, and a three-quarter view — use all of them. Back photos reveal yoke shaping, back neckline depth, and whether the back length differs from the front. Side views clarify sleeve attachment and body silhouette. Detail shots of cuffs and hems show the ribbing depth and stitch pattern clearly.
Handling Complex Designs
Some sweaters are more challenging to recreate than others, and it's worth knowing where the difficulty spikes before you commit.
Colorwork patterns: You'll need to chart the color design separately on knitting graph paper or in charting software. Each color block needs to be mapped out stitch by stitch. Some AI tools can approximate colorwork charts, but complex motifs may need manual refinement.
Cables: There are hundreds of named cable variations. Try to identify the specific cable — its stitch count, crossing direction, and crossing frequency — using a cable stitch dictionary. Even if you can't find an exact match, a close approximation will look nearly identical in the finished garment.
Unusual silhouettes: Cocoon sweaters, asymmetric hems, dramatic A-line shapes, or draped constructions involve shaping logic that departs significantly from standard patterns. These may require more manual adjustment even when using AI tools.
Vintage garments: Sweaters from earlier decades (particularly pre-1990s) sometimes use construction methods, fiber contents, and silhouettes that aren't standard today. Vintage proportions often have shorter bodies, longer sleeves, and very different ease expectations. Be prepared to adapt significantly.
Testing Your Pattern
Before casting on an entire sweater's worth of expensive yarn, consider a few precautionary steps.
If your construction is worked in the round, knit a small test swatch in the round — because circular gauge can differ from flat gauge for some knitters, especially continental knitters or those who tension differently on the purl row.
Some knitters make a toile — a trial version in inexpensive, similar-weight yarn — to verify fit and construction before committing to their real yarn. This is especially worthwhile for complex constructions or when recreating a garment in a very different yarn weight than the original.
If you're working from an AI-generated pattern, read through the entire pattern before starting. Check that stitch counts at each section boundary are logical, that shaping numbers add up, and that the construction sequence matches what you identified in the source photo.
From Photo to Finished Sweater
The journey from seeing a sweater you love to wearing one you made yourself is one of knitting's most satisfying arcs. It asks you to be both analytical and creative — to read fabric like a language, to trust your math, and to put your own hands to the work of making something real. Whether you enjoy the puzzle of manual pattern engineering or prefer to let AI handle the calculations, the result is the same: a custom garment engineered for your body, knit in yarn you chose, completed with your own hands.
The more sweaters you reverse-engineer this way, the faster you get. Over time, you'll start recognizing raglan lines instantly, reading cable repeats at a glance, and estimating ease from a photo without thinking. Each photo-to-pattern project builds skills that make every future project easier.
Frequently Asked Questions
How do I convert a photo to a knitting pattern? Analyze the construction method (seamless vs. pieced, top-down vs. bottom-up, sleeve type) and identify the stitch patterns in use. Take detailed body measurements and decide on your ease. Knit a full gauge swatch in your yarn, washed and blocked. Then calculate cast-on stitch counts, row counts, and shaping sequences using your gauge and measurements. Alternatively, use an AI tool like La Maille to upload the photo, enter your measurements and gauge, and receive a complete row-by-row pattern automatically.
What makes a good source photo for pattern generation? Clear, even lighting with no harsh shadows, a front-facing view showing the full silhouette, sufficient resolution to see stitch texture, and a neutral background that defines the sweater's edges. Having photos from multiple angles — front, back, and side — significantly improves the accuracy of construction analysis, especially for sleeve type and back neckline depth.
Can AI really generate accurate knitting patterns from photos? Yes, with important caveats. AI pattern generators analyze visual construction cues, estimate proportions, and calculate stitch counts based on the gauge and measurements you provide. Tools like La Maille produce complete row-by-row instructions — not just colorwork charts — covering cast-on, shaping, and finishing. The accuracy depends on the quality of the source photo and the precision of your input measurements and gauge.
What if the sweater in my photo has a complex stitch pattern? First, try to identify the stitch type using a stitch dictionary (Harmony Guides, Vogue Knitting Stitch Dictionary) or Ravelry's pattern search filtered by texture. For cables, count the stitches in the cable column and identify the crossing frequency. For colorwork, you may need to chart the motif manually on graph paper or use dedicated charting software. For lace, look for the repeated unit (a "repeat") and identify which decreases frame which yarn-overs.
How accurate are AI-generated knitting patterns? When you provide precise gauge measurements (from a washed and blocked swatch) and accurate body measurements, AI-generated patterns are mathematically consistent and proportionally sound. As with any pattern — hand-engineered or AI-generated — it's good practice to read through the entire pattern before starting, check that stitch counts at section transitions are logical, and swatch thoroughly. Adjust for personal fit preferences as needed; no pattern generator can account for individual knitting quirks like tight cast-ons or personal row gauge variation.
How do I figure out the ease in a sweater from a photo? Look at how the garment sits on the body in the photo. If it drapes loosely and the body doesn't show through, assume at least 4 to 6 inches of positive ease. If it fits closely but isn't tight, estimate 1 to 3 inches. If it's clearly fitted through the torso, it may have minimal ease (0 to 1 inch) or even slight negative ease in the case of a very body-conscious design. Ease assumptions significantly affect your final stitch count, so err on the side of more ease if you're unsure — it's easier to knit a slightly larger sweater than to rip out a too-small one.
Ready to turn your photo into a pattern? Try La Maille and generate your custom pattern today.