The key to knitting a sweater that fits is accurate gauge swatching, honest body measurements, and choosing pattern size by finished measurements — not size labels. A half-stitch-per-inch gauge difference can result in a garment 2–4 inches off target size, which is the single most common cause of fit problems in handknit sweaters. Whether you're working from a published pattern or generating a custom one with La Maille, these fundamentals determine your success. Fit is not luck — it is a skill, and it can be learned step by step.
Why Sweaters Don't Fit
Before we fix the problem, let's understand why it happens so consistently — even for experienced knitters.
Pattern sizing doesn't match your body: Patterns are designed for standardized, hypothetical bodies that may look nothing like yours. The "medium" assumes specific proportions — a particular bust-to-waist ratio, a standard shoulder width, a common torso length — that you might not share. This is not a personal failing; it's just math applied to the average of a population.
Gauge issues: Even a small gauge difference compounds dramatically across a whole sweater. Half a stitch per inch off sounds trivial, but over 200 stitches it translates to a garment that's 2–4 inches too big or too small. Across both the front and back of a sweater, that error can add up to nearly 5 inches in total circumference — the difference between a sweater that fits and one you never wear.
Ease confusion: You picked size "38" because that's your bust measurement, not realizing the finished bust is 38 inches with zero ease. Most sweater patterns include 1–4 inches of positive ease at the bust for a comfortable fit. A fitted style might have just 1–2 inches; a relaxed, oversized design might include 6–10 inches. If you don't understand ease, you will consistently pick the wrong size.
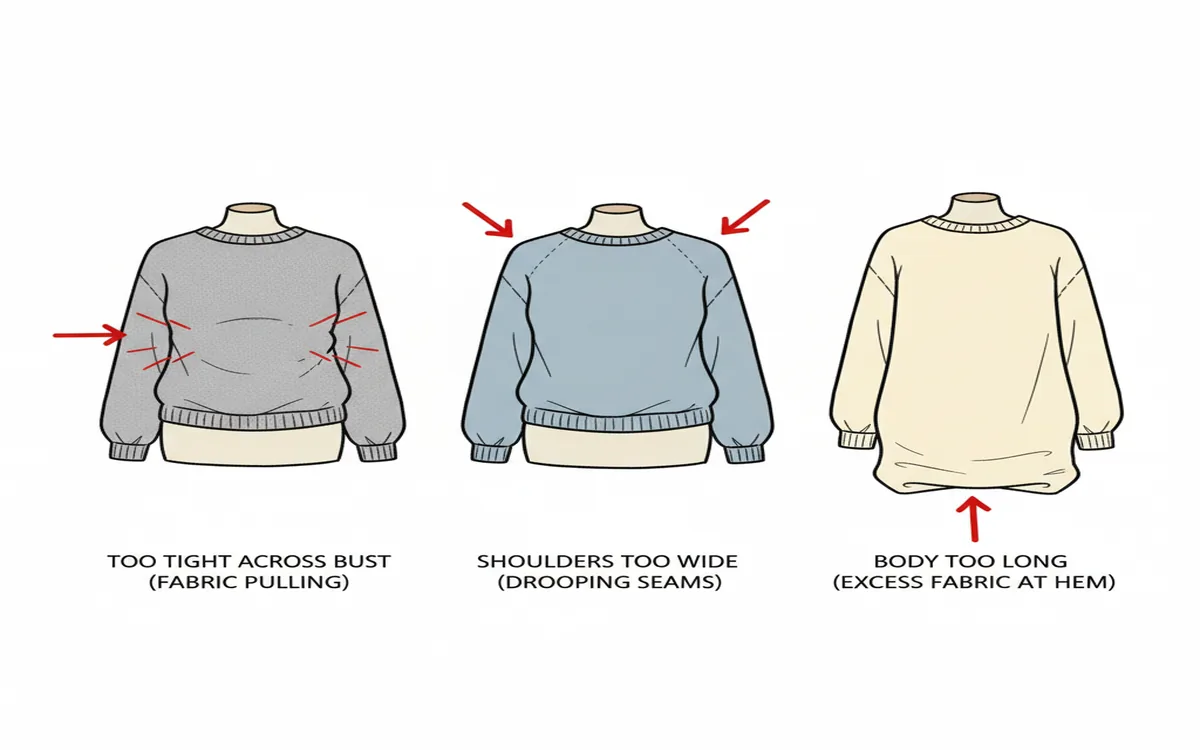
Ignoring fit indicators: You noticed something felt off at the yoke but kept going, hoping it would "work out." It didn't. Experienced knitters learn to trust early warning signs in their knitting. If the fabric pulls across the chest while it's still on your needles, it will pull when it's on your body.
Let's fix each of these systematically.
Step 1: Know Your Measurements
Not your dress size. Not what you wore last year. Not what you feel like you should be. Your actual body measurements, taken accurately with a soft tape measure while wearing the undergarments or light clothing you'd wear under a sweater.
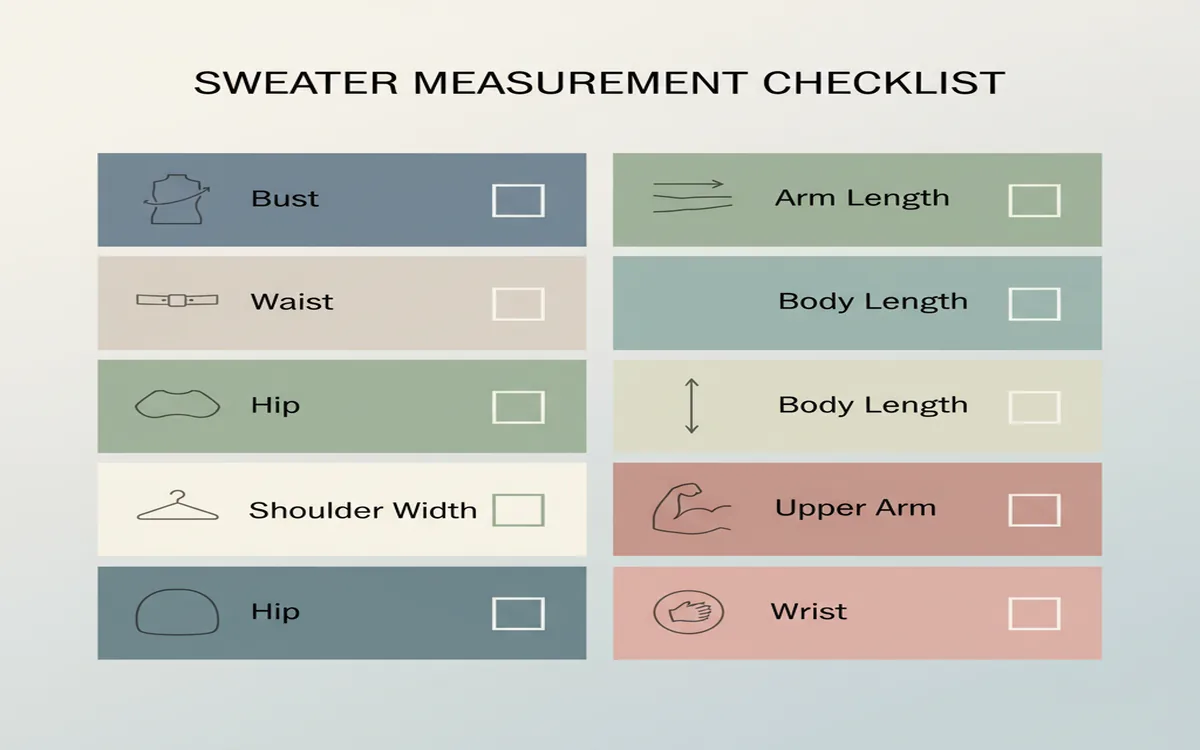
At minimum, you need:
- Bust circumference at the fullest point
- Waist circumference at the natural waist
- Hip circumference at the fullest point
- Shoulder width (measured across the back, from shoulder point to shoulder point)
- Cross-back width (measured between the two points where your arms meet your torso)
- Full arm length (from shoulder point to wrist, arm slightly bent)
- Upper arm circumference (around the fullest part of your upper arm)
- Wrist circumference
- Torso length (from shoulder to waist, and waist to hip)
Write these down in a dedicated notebook or digital document. Reference them for every single project. Your measurements change over time, so re-measure at least once a year. Many knitters find that having accurate measurements on hand saves hours of second-guessing and ripping back.
It also helps to identify what your "fit priority" measurement is — the measurement you most want to match. For many knitters, this is the bust or upper arm. Knowing your priority helps you make smarter decisions when you're between sizes.
Step 2: Understand the Pattern Measurements

Every well-written pattern includes a schematic — a line drawing showing the finished dimensions of each piece. This is your single most important tool for choosing size and planning modifications. Do not skip it.
Study the schematic carefully:
- What is the finished bust measurement at each size?
- What is the shoulder width?
- How long is the body from underarm to hem?
- What is the total length, including the yoke?
- What is the upper arm circumference at each size?
- What is the sleeve length?
Compare every measurement to your body measurements plus your desired ease. If the pattern's finished bust is 40 inches and you want 4 inches of ease, this sweater works for a 36-inch bust — not a 40-inch bust. If you wear a 40-inch bust and choose that size, you'll have a sweater with zero ease that may feel uncomfortably snug.
Also pay attention to proportions. Some patterns have wider upper arms relative to the bust; others have very narrow shoulders. If a proportion doesn't match yours, that's where you'll need to modify.
Step 3: Choose Size by Fit, Not Label
Here's the fundamental mindset shift that separates knitters who reliably get good fit from those who don't: you are not choosing "your size." You are choosing the size whose finished measurements most closely match what you want the finished garment to measure.
That might look like:
- Size Large for the bust circumference
- Size Medium for the shoulder width
- Size Small for the body length
Patterns are not bodies. They're grids of numbers, and you're allowed to mix and match as long as you understand what you're adjusting. If you're between sizes or different sizes in different areas, start by prioritizing the measurement that is hardest to modify — usually the shoulder width or upper bust. Plan to modify the easier dimensions (length, lower body width, sleeve width) to match the rest of your measurements.
Step 4: Make a Gauge Swatch (For Real)
You have heard this a thousand times. Here is exactly why it matters so much that it cannot be overstated.
A pattern written at 5 stitches per inch, knit at 4.5 stitches per inch, will be approximately 10% larger in every single dimension. A 40-inch finished bust becomes 44 inches. Sleeves designed for your exact arm length will now be too wide and possibly too short. The entire geometry of the garment shifts.
Conversely, if you knit at 5.5 stitches per inch on the same pattern, that 40-inch bust becomes 36 inches — potentially unwearable.
For accurate results, your swatch must:
- Be knit in the round if your sweater will be knit in the round (tension often differs between knit and purl rows in flat knitting)
- Be worked in the main pattern stitch, not just stockinette unless that is the pattern stitch
- Be washed and blocked exactly as you plan to wash the finished sweater
- Be measured in the center — not at the edges, which may be distorted
- Measure at least 4 inches wide and 4 inches tall before blocking
If your gauge doesn't match after blocking, switch needle sizes. Go up if your gauge is too tight (too many stitches per inch), down if it's too loose (too few stitches per inch). Many knitters need to go up or down an entire needle size from what the pattern recommends. That's completely normal.
Step 5: Do the Math (Or Let Technology Do It)
If your gauge is off or you need to modify the stitch counts, here is the formula that will save you:
Your stitches = Pattern stitches × (Pattern gauge ÷ Your gauge)
Example: A pattern calls for 200 stitches at 5 stitches per inch. Your gauge is 4.5 stitches per inch. 200 × (5 ÷ 4.5) = 222 stitches to achieve the same finished width.
This formula applies to every single stitch count in the pattern — sleeve cast-on, yoke increases, neckline stitches, everything. It takes time, but the alternative is wearing a sweater that doesn't fit.
Alternatively, use tools like La Maille that generate entire patterns based on your specific gauge and measurements. The math is done for you, calibrated to your exact numbers.
Step 6: Make Strategic Modifications
Common modifications that reliably improve fit without requiring you to rewrite the entire pattern:
For a Fuller Bust
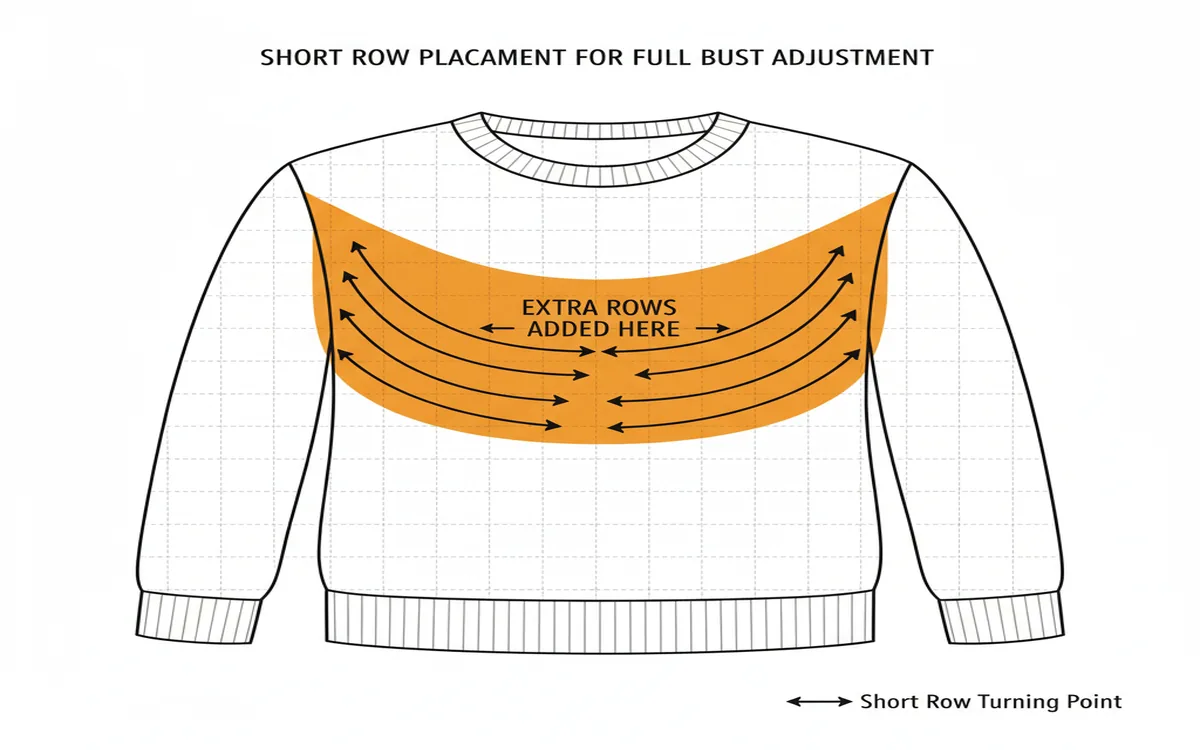
Add short rows across the front chest to create additional room without adding width at the sides. A standard full bust adjustment (FBA) adds 1–2 inches of length at center front. The short rows are typically worked between the bust line and the underarm, and they're invisible in the finished fabric. This is one of the most transformative modifications available to knitters with a cup size larger than B.
For Broad Shoulders
If the body width is correct but the shoulders are too narrow, you may need to size up in the yoke only. Look for patterns with set-in sleeves (which give the most control over shoulder fit) or adjustable saddle shoulders. Raglan constructions can be harder to modify for shoulder width specifically, though they are generally more forgiving of minor differences.
For Long or Short Torsos
Add or remove rows between the underarm and the waist, or between the waist and the hem, before any shaping begins. Do not change length within the shaping sections themselves — that will distort the decreases and increases. The "plain" sections on either side of the waist shaping are your modification zones.
For Different Upper Arm Size
Adjust the number of sleeve increases to reach your specific upper arm circumference before the sleeve becomes straight. More increases equal a wider sleeve cap. Spread the increases over the same vertical length as the pattern to preserve sleeve shape. Check that your upper arm circumference plus 2–3 inches of ease matches the sleeve measurement at the widest point.
For Wide or Narrow Hips
Many sweaters are knit straight from underarm to hem with no hip shaping. If you have significant hip-to-waist difference, look for patterns with A-line or waist-shaping options, or add increases at the hem yourself. A few sets of paired increases in the lower body can add 2–4 inches of ease at the hip without changing anything above the waist.
Step 7: Try On Early and Often (If Possible)
Top-down construction is one of the great gifts of modern knitting patterns precisely because it allows you to try on the garment as you go. Use this advantage aggressively:
- Try on at the yoke before separating sleeves — check shoulder width and neck circumference
- Try on when the body is 3–4 inches long — check underarm placement and bustline
- Try on sleeves before the final bind-off — check length and upper arm width
If something feels wrong at any of these checkpoints, stop. Rip back to where the problem began and fix it. This takes courage but saves enormous time compared to finishing a sweater you'll never wear.
For bottom-up or flat construction, you can't try on in the same way, but you can measure frequently: lay your knitting flat and compare its dimensions against a well-fitting sweater you already own, or against your body measurements directly.
Step 8: Trust Your Observations
If the fabric feels too tight across your chest while you're still knitting, it will be too tight when you're wearing it. If the armholes seem too low or the yoke seems too short, that impression is usually correct.
Don't rationalize away discomfort or doubt. Experienced knitters know that the instinct to "just finish it and see" usually leads to regret. Fix it now, even if that means ripping back two inches or an entire section. Future you will be grateful.
Keep a fit journal or annotate your patterns digitally. Note what you changed, what worked, and what you'd change next time. Over 3–4 projects, you'll develop a reliable personal modification formula that applies across most patterns.
Fit Issues and Fixes
Shoulders too wide: Choose a smaller size overall, or look for patterns with raglan, circular yoke, or drop-shoulder construction, which are structurally more forgiving of shoulder width variations.
Bust too tight: Add width with paired increases at the side seams, or use short rows for targeted bust shaping without affecting overall width.
Body too boxy: Choose a pattern with built-in waist shaping, or add it yourself by working paired decreases toward the waist and paired increases back out to the hip. Typically 2–4 rounds of decreases and increases spaced 1–2 inches apart creates a noticeable and flattering waist effect.
Sleeves too long: The easiest fix in knitting — simply work fewer rows before the sleeve cuff.
Neckline too tight: Cast on more loosely for the bind-off round, use a larger needle for the neckband only, or switch to a stretchy bind-off method like the Jeny's Surprisingly Stretchy Bind-Off.
Armholes too deep: This often happens when you size up for the bust. Consider choosing the smaller size and adding width at the sides instead.
Side seams twisting forward: This is usually a tension issue or a sign that the front and back have different stitch counts than they should. Check your pattern math carefully.
When to Use Custom Pattern Generation
Some fit challenges are genuinely easier to solve by starting with a custom pattern rather than repeatedly modifying a standard one:
- Your measurements don't align with standard size proportions (for example, a large bust with narrow shoulders, or a very long torso with short arms)
- You're between sizes in three or more measurements
- You've had consistent fit problems across multiple commercial patterns
- You want to recreate the specific drape and silhouette of a sweater you saw, not just approximate a published design
Custom pattern generation tools work by calculating all stitch counts, shaping sequences, and construction math directly from your gauge and body measurements. Instead of starting from a standardized template and modifying, you start from a pattern that was built around your specific numbers from the beginning.
The Effort Is Worth It
A well-fitting handknit sweater is genuinely one of the best garments you can own. It drapes correctly over your particular body. It moves with you. It looks intentional — polished and purposeful — rather than approximate or homemade in the pejorative sense.
Getting fit right takes more effort upfront: careful measuring, deliberate gauge swatching, thorough pattern analysis, and sometimes significant modifications. But consider the alternative — hours of knitting that results in a garment you fold up and never wear, or give away, or worse, leave you feeling like knitting "isn't for your body type." That's never true. The pattern just wasn't for your body.
Invest the upfront time. Swatch. Measure. Do the math or find a tool that does it for you. Try on early and trust what you feel. The result is a sweater that fits like it was made for you — because it was.
Frequently Asked Questions
Why don't my knitted sweaters fit well? The most common causes are choosing the wrong size based on size labels rather than finished measurements, gauge mismatch between your knitting and the pattern's gauge, misunderstanding ease, not taking accurate body measurements, or working from patterns designed for standardized proportions that don't match yours. Most fit problems have a clear root cause that can be identified and corrected.
How do I choose the right pattern size? Don't match by size label. First, determine your desired finished bust measurement by adding your preferred ease to your actual bust circumference. Then find the pattern size whose finished bust measurement is closest to that number. Repeat this process for shoulders and upper arm, which are harder to modify than length or lower body width.
What's the most important step for good fit? Accurate gauge swatching is the single most important step. A half-stitch-per-inch difference compounds across hundreds of stitches and can make a sweater 2–4 inches off in every dimension. Always knit your swatch in the round if the sweater is worked in the round, wash and block it exactly as you'll wash the finished garment, then measure carefully in the center of the swatch before starting your project.
Should I trust pattern size charts? Trust the finished measurements listed in the schematic, not the size labels. The word "medium" varies enormously between designers, yarn brands, and decades. Two patterns both labeled "medium" can differ by 4 or more inches in finished bust. Always work from actual centimeters and inches, not labels.
Can AI pattern generators help with fit? Yes, significantly. Tools like La Maille generate patterns from your exact measurements and gauge, eliminating size chart guesswork entirely. Rather than choosing the nearest size and hoping modifications will cover the gap, you receive a pattern where every stitch count and shaping sequence was calculated for your specific body.
What is ease and how much should I use? Ease is the difference between your body measurement and the finished garment measurement. Positive ease means the garment is larger than your body — a fitted sweater might have 1–2 inches of positive ease at the bust, while an oversized style might have 6–10 inches. Negative ease means the garment is smaller than your body and relies on fabric stretch, common in fitted ribbed designs. Most standard sweater patterns are written with 2–4 inches of positive ease at the bust as the default comfortable fit.
How do I fix a sweater that fits everywhere except the upper arm? If the body fits but the sleeves are too tight at the upper arm, the most targeted fix is to size up in the sleeve only. Cast on more stitches for the sleeve cap, or work additional increases along the sleeve to reach a wider circumference before the sleeve becomes straight. Aim for your upper arm circumference plus at least 2 inches of ease for comfortable movement. If the sleeve is worked from the top down, you can adjust the initial sleeve pick-up to include more stitches.
Ready to knit something that actually fits? Start with your measurements, swatch honestly, and let the numbers guide your decisions — not the size labels.